Getting Started
Everything you need to know to start monitoring your websites with SiteRooster.
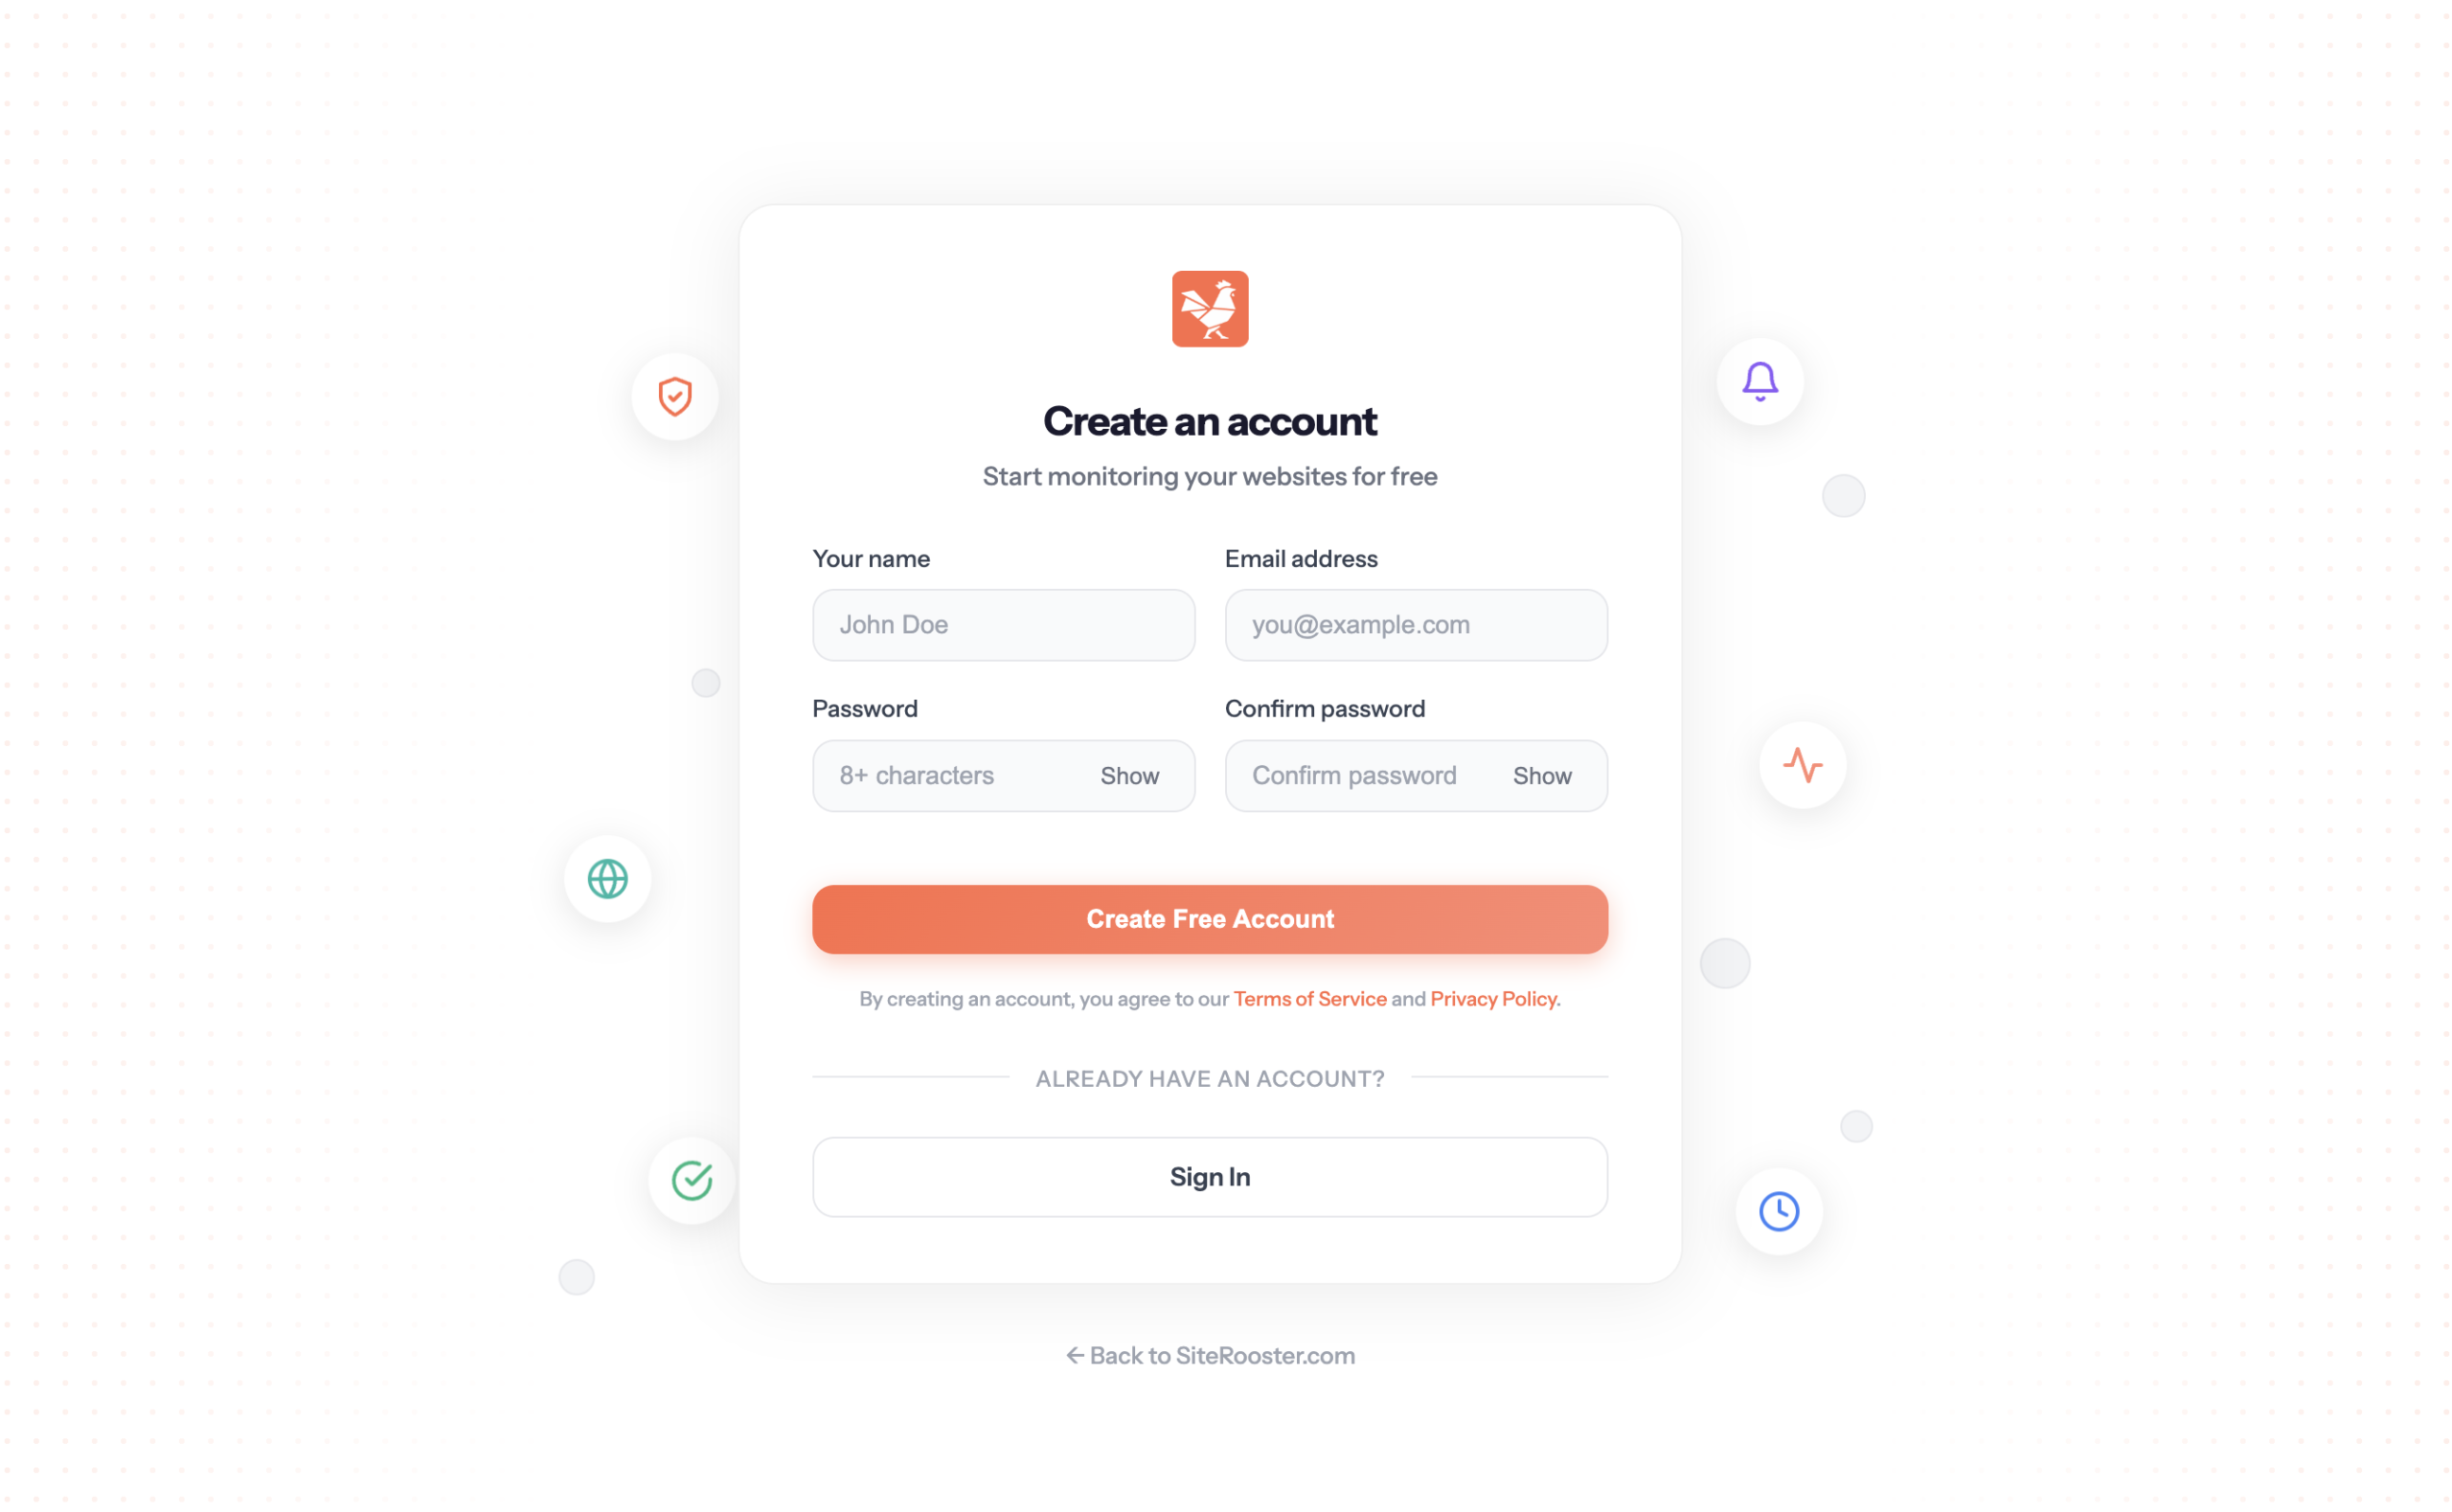
Creating your account
Getting started with SiteRooster is quick and easy. You can create an account in two ways:
Option 1: Start with Free Plan
- Visit siterooster.com/register
- Enter your email address and create a password
- Verify your email address
- You’re ready to add your first website!
Option 2: Subscribe to a Paid Plan
- Visit our Pricing page
- Select your preferred plan (Small, Medium, or Enterprise)
- Complete checkout via Stripe
- Your account is automatically created and you’re logged in
Adding your first website
Once you’re logged in, adding a website to monitor takes just seconds.
- From your Dashboard, find the “Add New Site” section
- Enter your website URL (e.g.,
https://example.com) - Click Add Site
SiteRooster will immediately begin monitoring your site for:
- Uptime — Is your site responding to requests?
- SSL Certificate — Is your certificate valid and when does it expire?
- Domain Expiration — When does your domain registration expire?
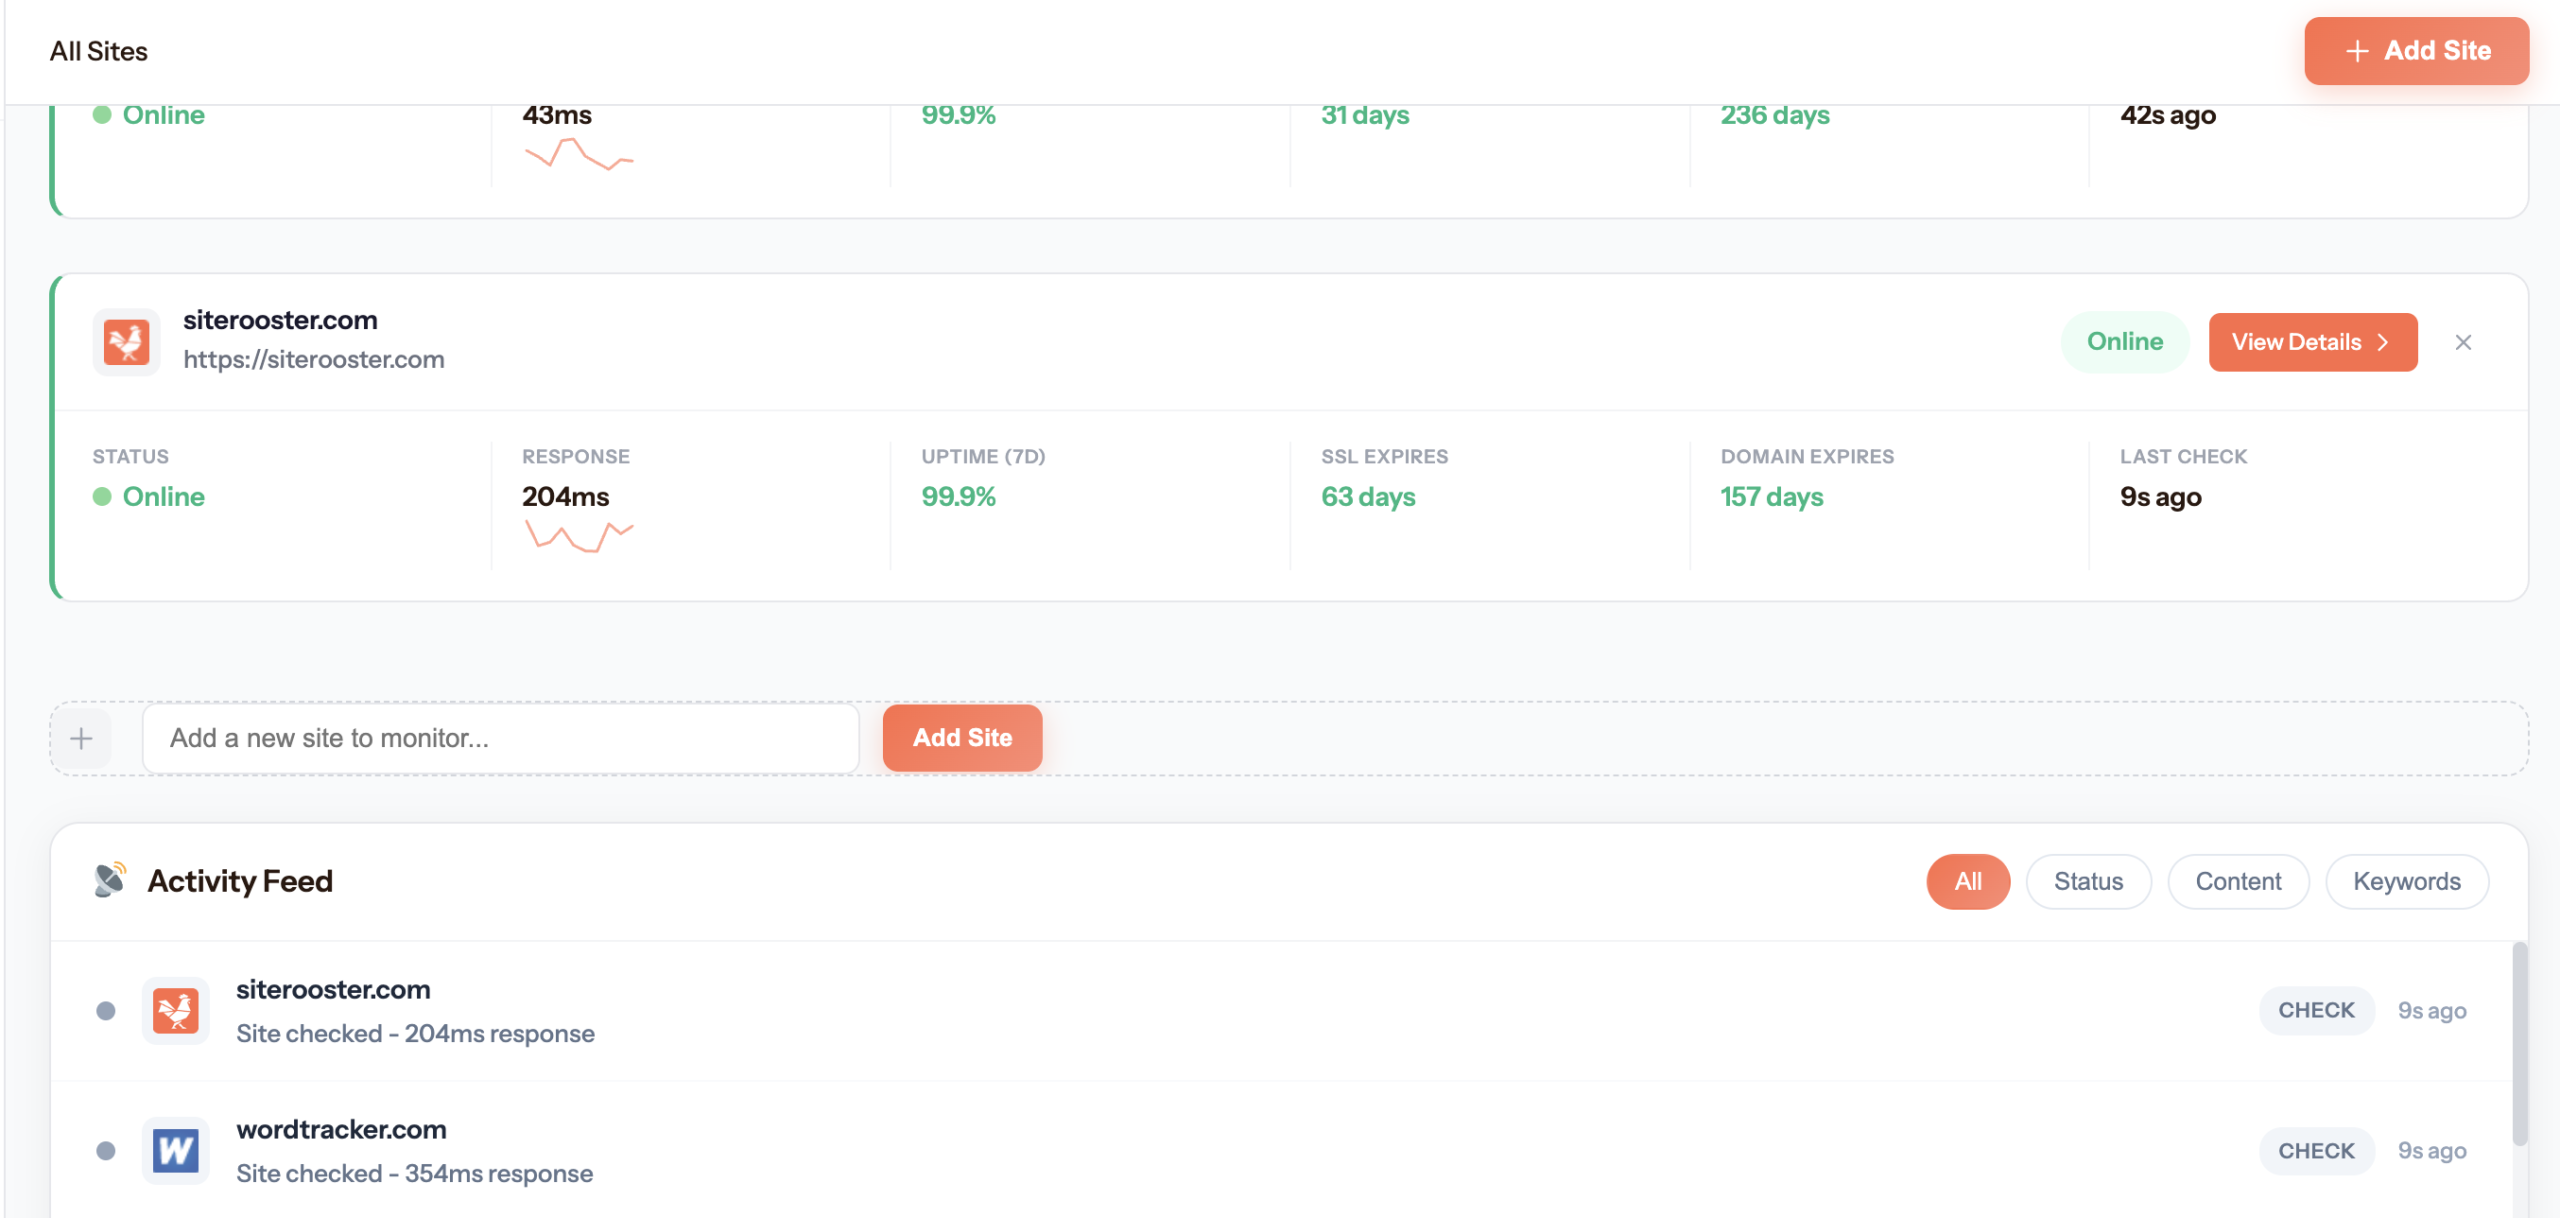
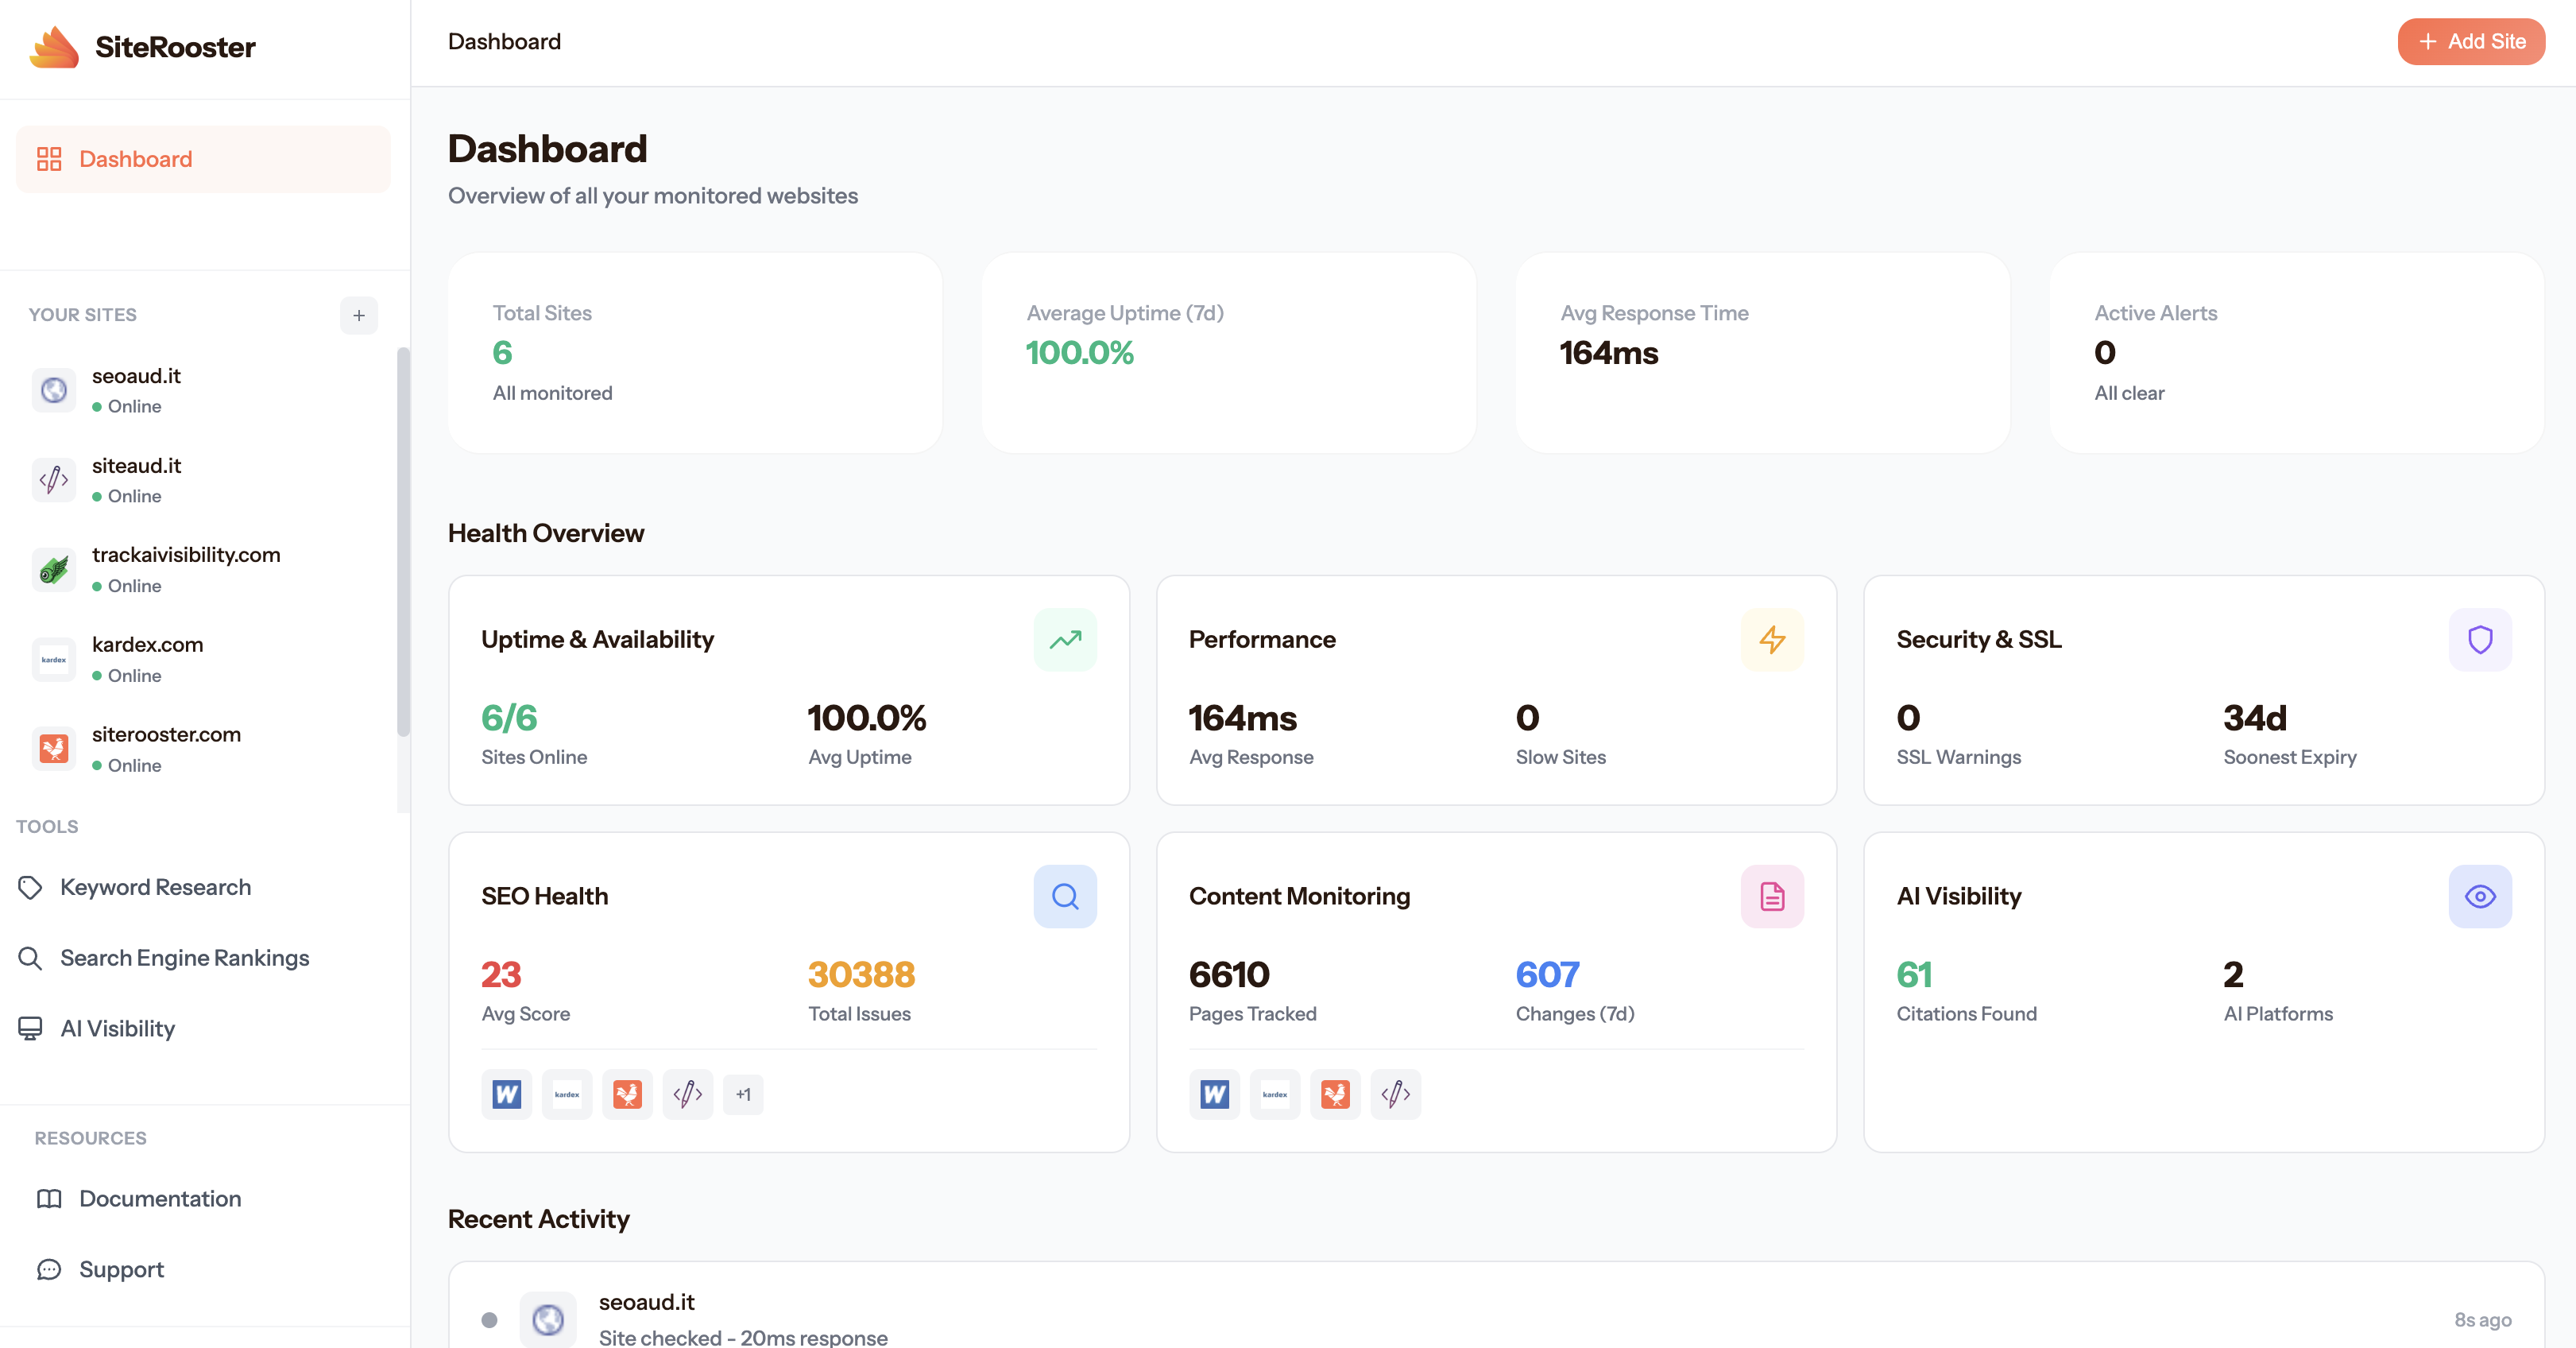
Understanding the dashboard
Your dashboard is the central hub for monitoring all your websites at a glance.
Stats Overview
At the top of your dashboard, you’ll see summary statistics:
- Total Sites — How many websites you’re monitoring
- Online — Sites currently responding normally
- Down — Sites that are unreachable or returning errors
- SSL Warnings — Sites with expiring or invalid SSL certificates
Site Cards
Each monitored site is displayed as a card showing:
- Site name and URL
- Current status (online/offline)
- Latest response time
- SSL certificate status
- Domain expiration countdown
Click any site card to view detailed monitoring data, uptime history, and configure content monitoring.

Status indicators
SiteRooster uses color-coded indicators throughout the interface to help you quickly understand the health of your sites.
Everything is working normally. Your site is online, SSL is valid, and domain isn’t expiring soon.
Attention needed. SSL certificate or domain is expiring within the alert threshold.
Immediate action required. Site is down, SSL is invalid/expired, or domain has expired.
Waiting for first check or data is being collected.
Site Health
Monitor your website’s uptime, security, and domain status.
Overview
The Overview tab provides a quick summary of your site’s health across all monitoring categories.
What you’ll see
- Current Status — Is your site up or down right now?
- Response Time — How fast your site is responding
- Uptime Percentage — Your site’s availability over time
- SSL Status — Certificate validity and expiration
- Domain Status — Registration expiration countdown
Click on any metric to dive deeper into that specific monitoring area.
Uptime monitoring
SiteRooster performs real HTTP/HTTPS requests to your websites at regular intervals. This is different from simple ping checks — we verify that your site actually responds with content.
What we check
- HTTP Status Code — We expect a 2xx or 3xx response
- Response Time — How long it takes to receive a response
- Connection Success — Whether we can establish a connection at all
Status detection
| Status | Condition | Description |
|---|---|---|
| Up | HTTP 2xx or 3xx | Site is responding normally |
| Down | HTTP 4xx, 5xx, or timeout | Site is not responding or returning errors |
| Error | Connection failed | Unable to establish connection (DNS failure, etc.) |
Check frequencies
How often we check your sites depends on your subscription plan:
| Plan | Check Interval | Checks per Day |
|---|---|---|
| Free | Every 5 minutes | 288 |
| Small | Every 1 minute | 1,440 |
| Medium | Every 1 minute | 1,440 |
| Enterprise | Every 1 minute | 1,440 |
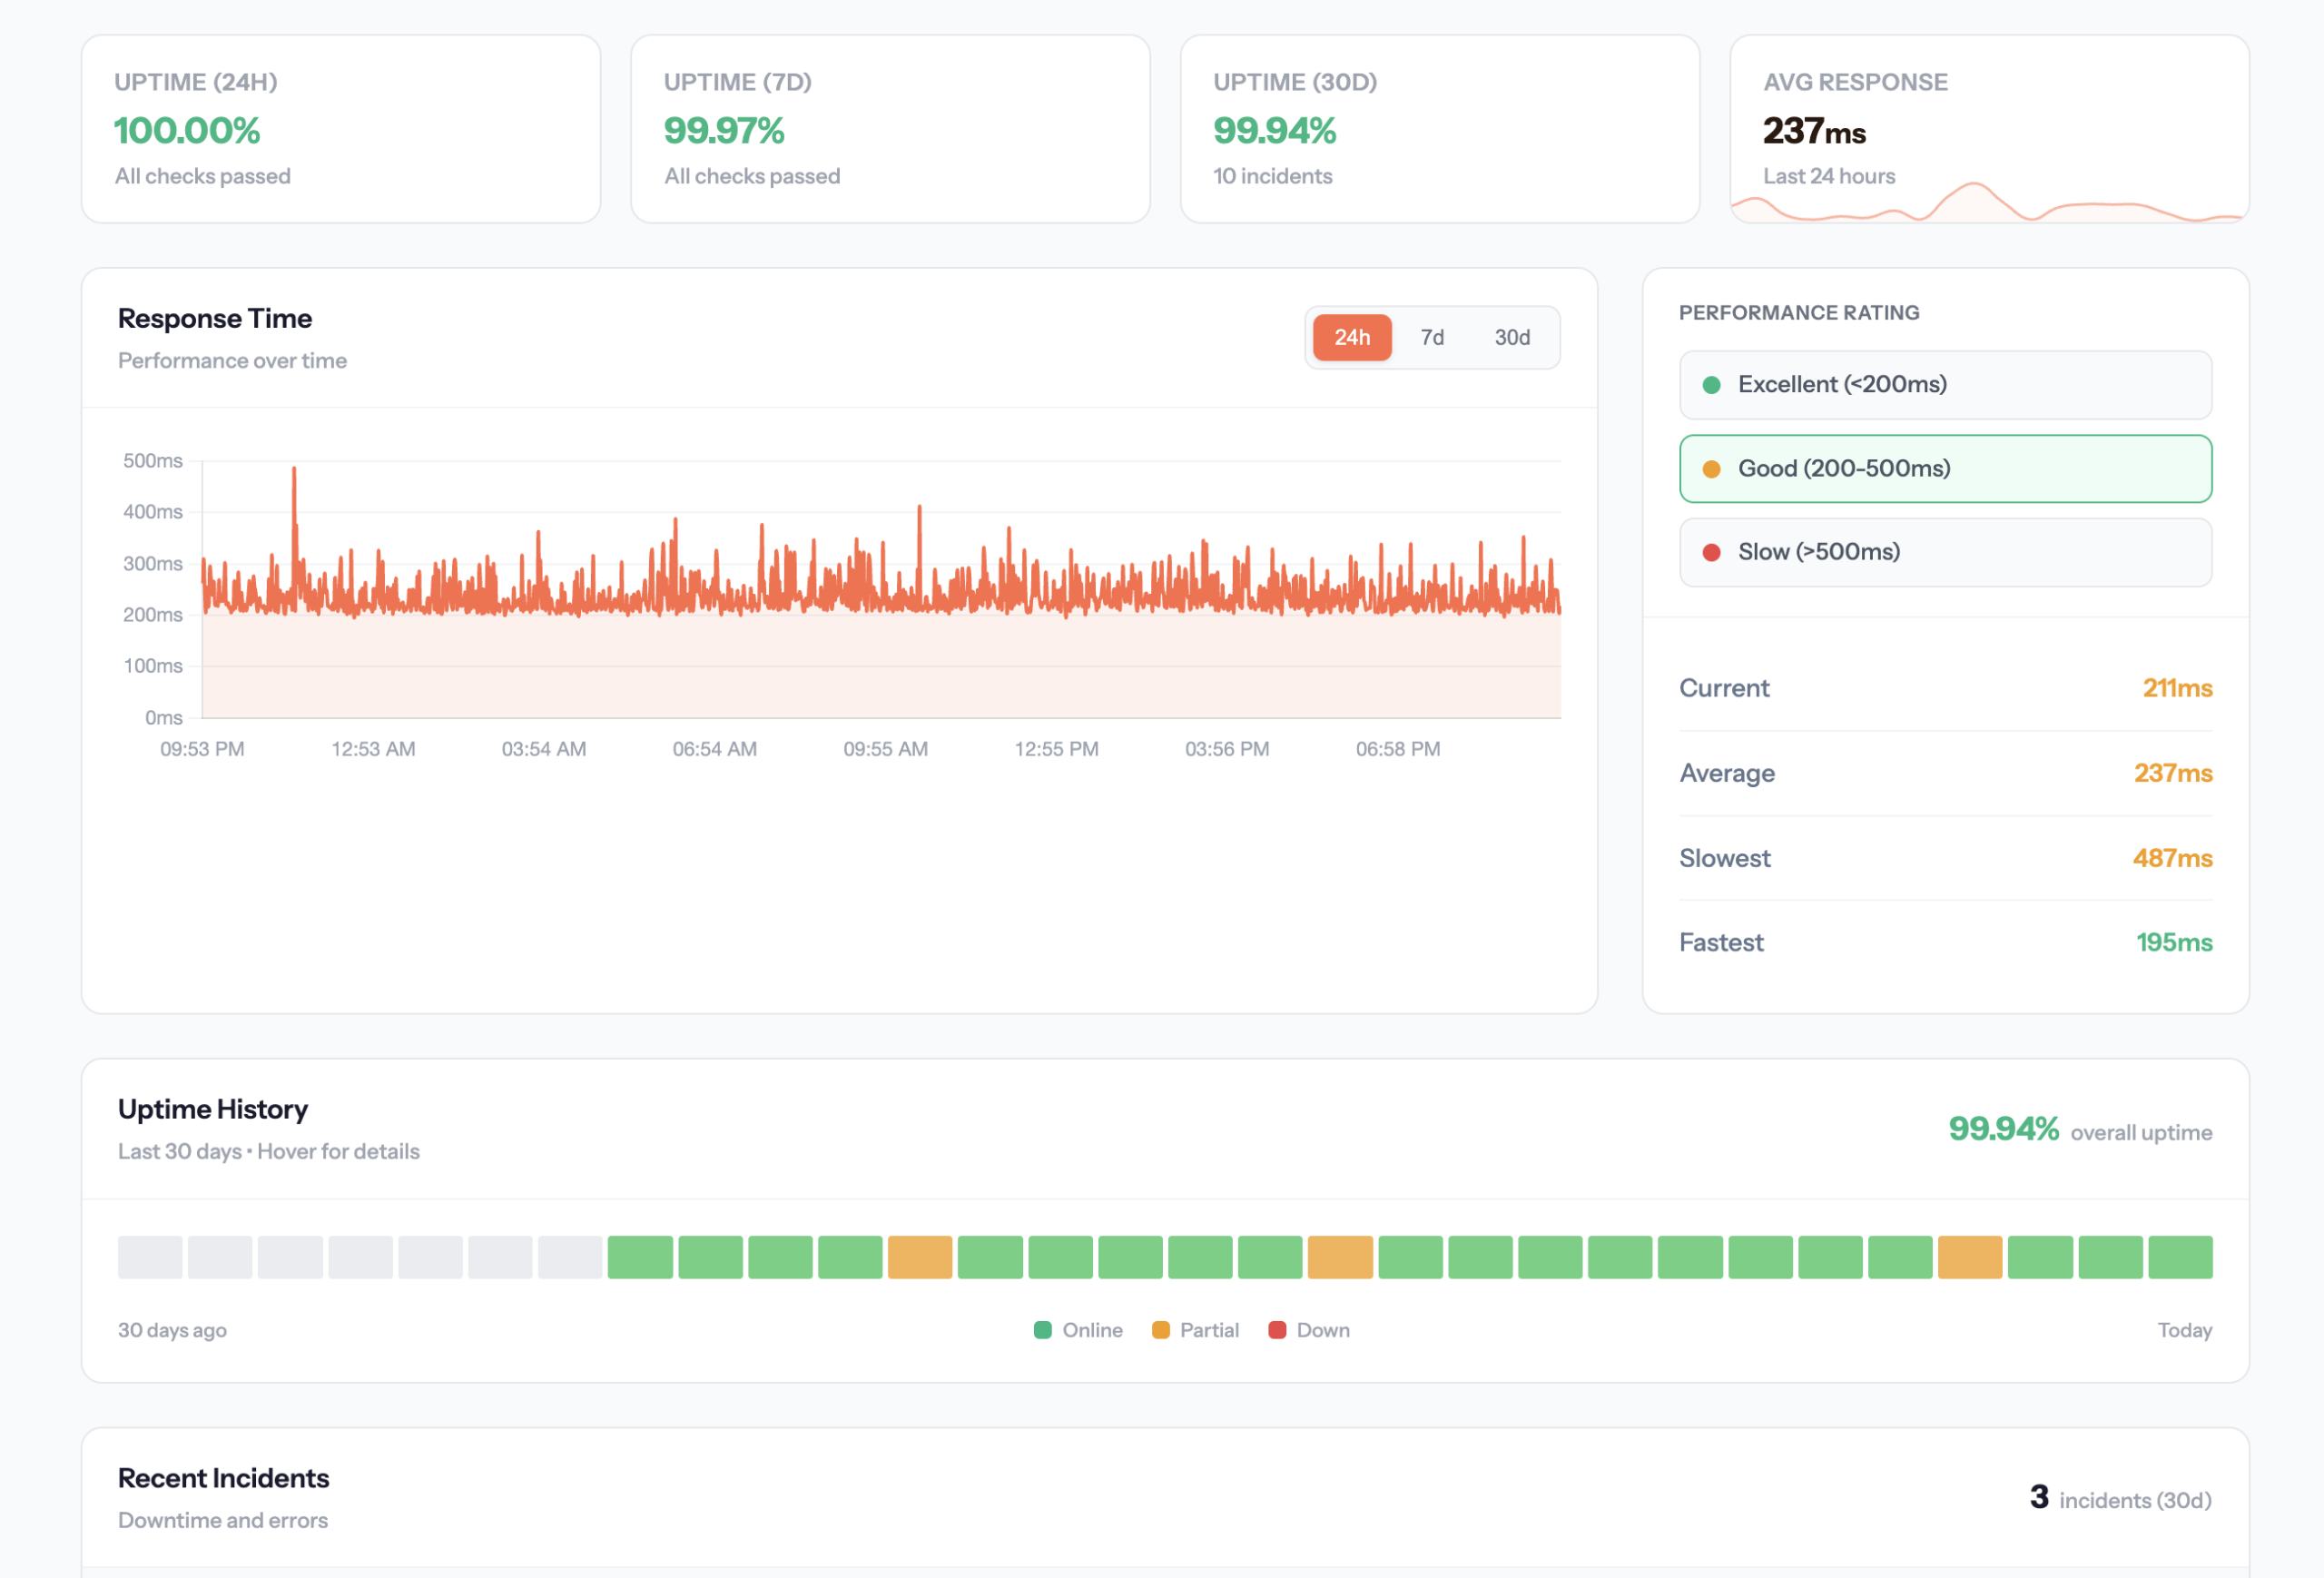
Uptime history
The visual uptime blocks show your site’s status over the past 30 days. Each block represents one day:
- Green block — 100% uptime that day
- Yellow/Orange block — Some downtime occurred
- Red block — Significant downtime
Hover over any block to see exact uptime percentage and incident details for that day.
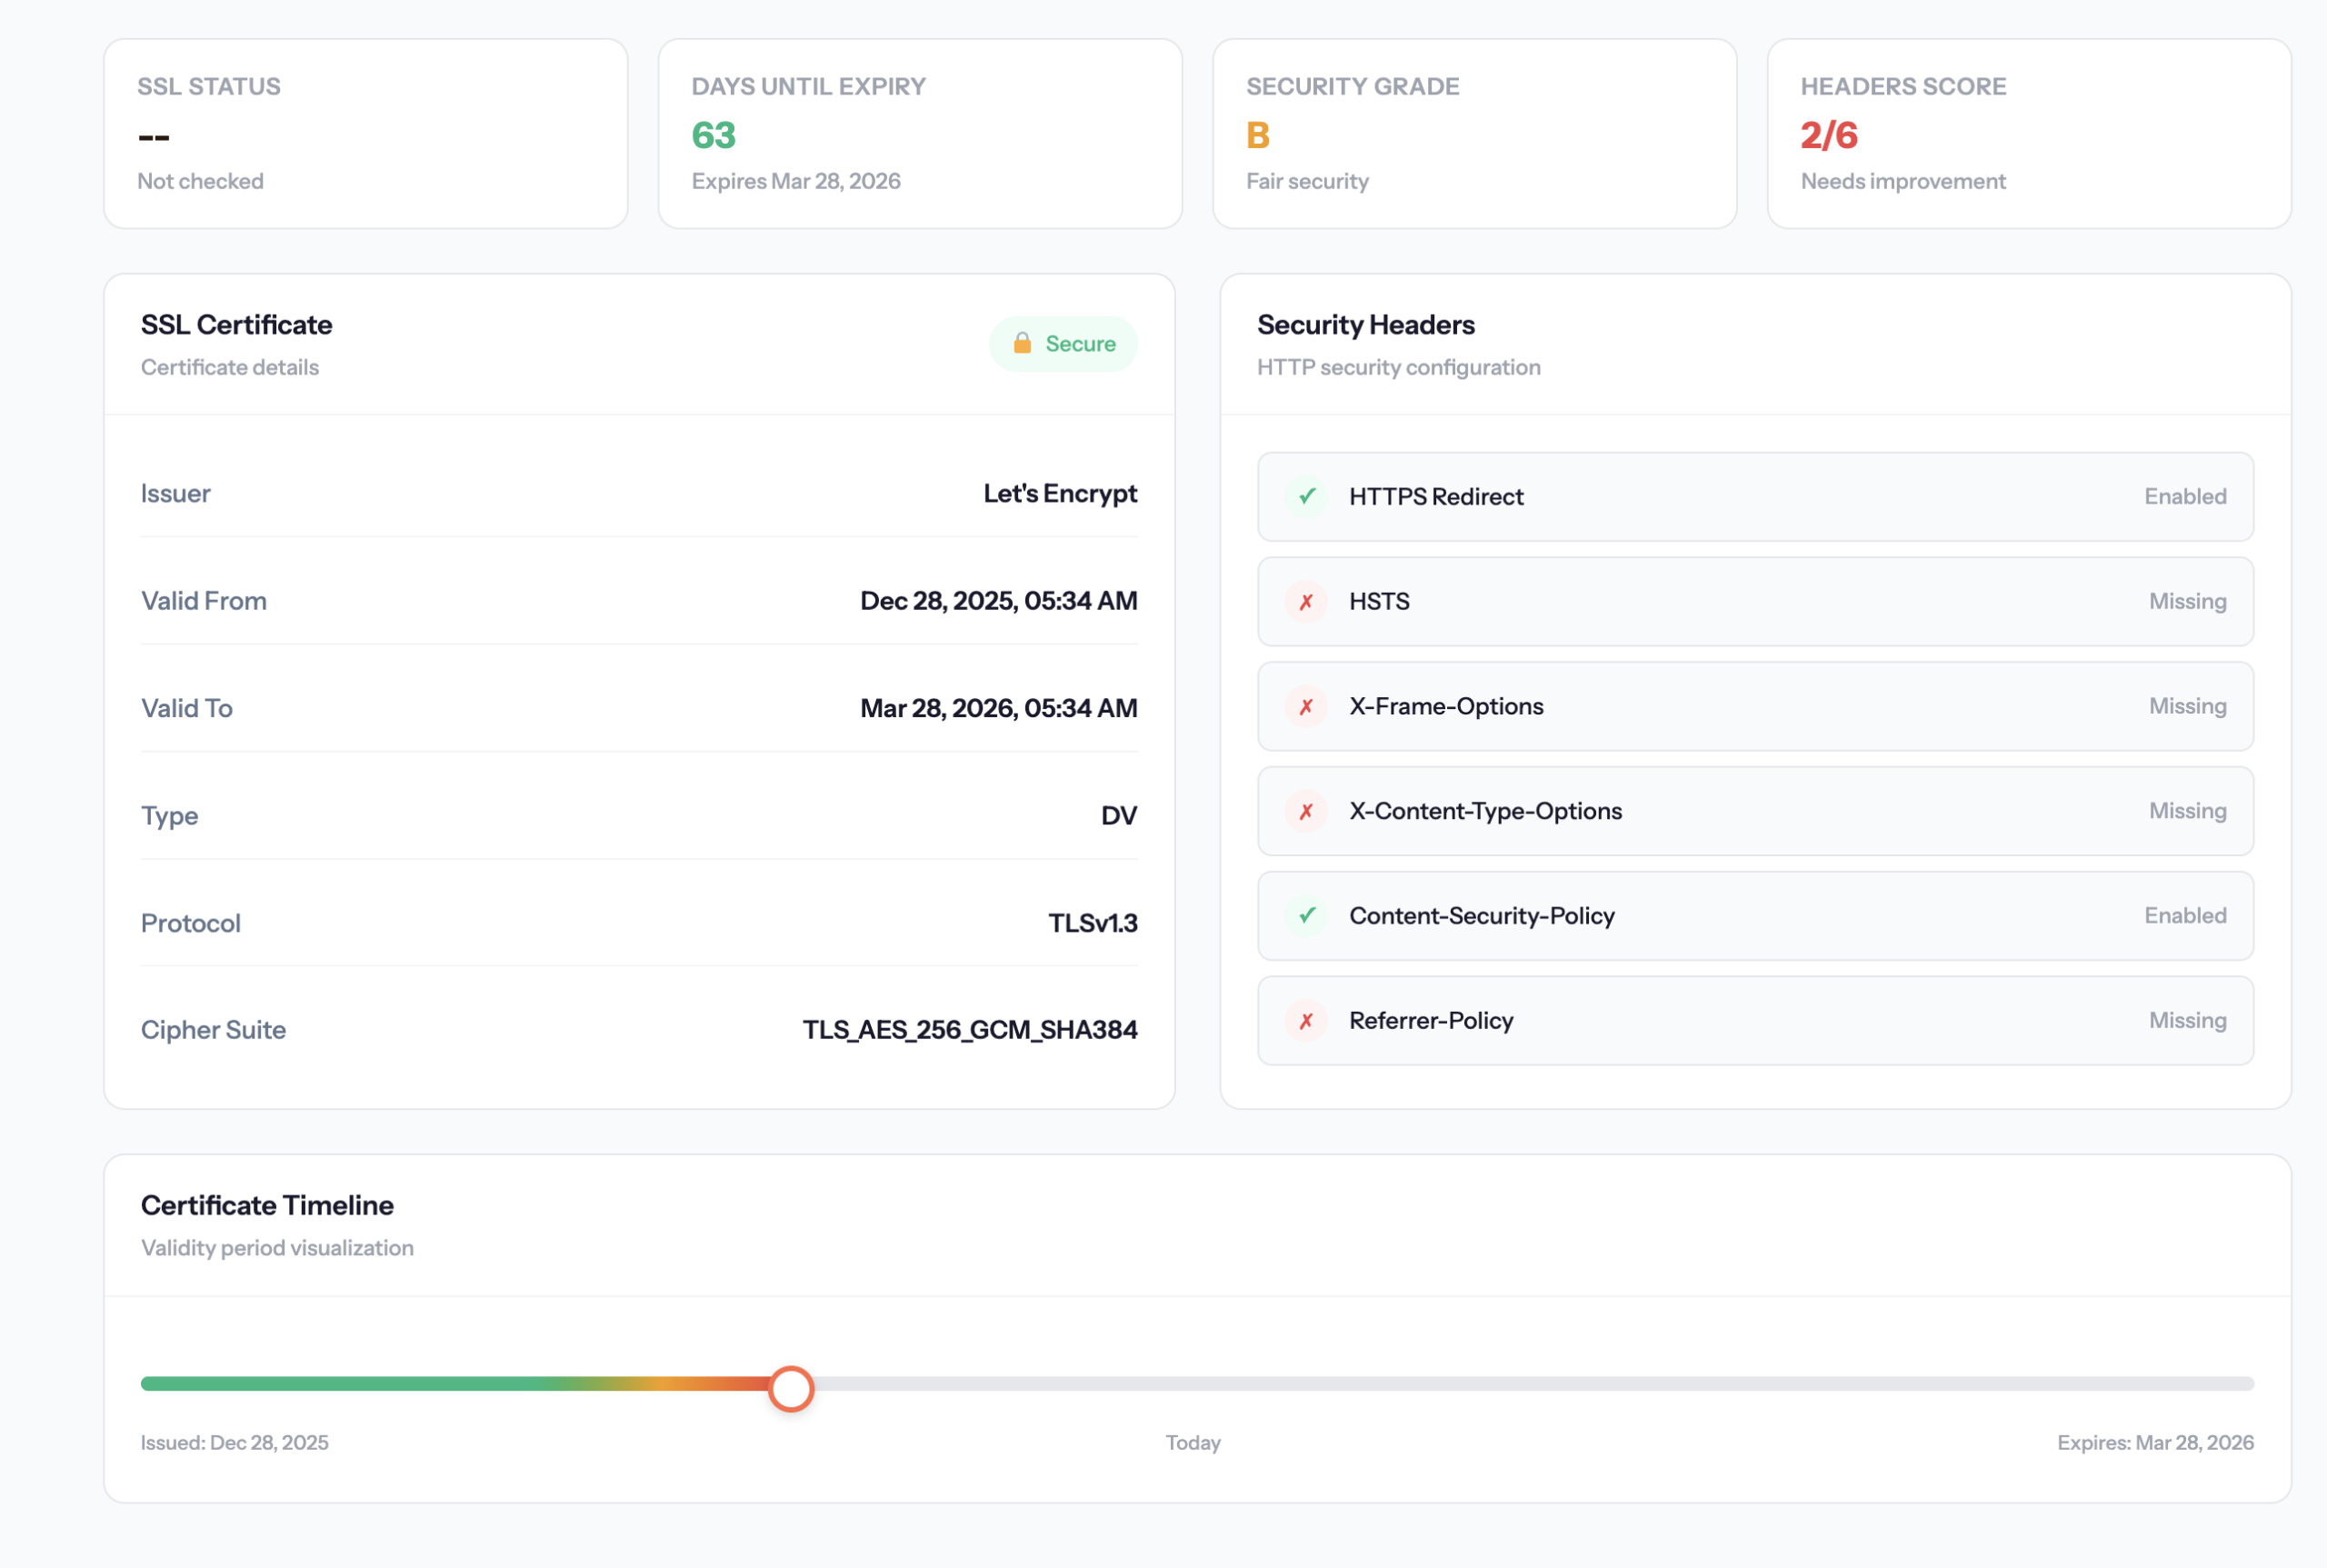
Security (SSL)
For sites using HTTPS, SiteRooster automatically monitors your SSL certificate status during every uptime check.
What we track
- Validity — Is the certificate properly issued and trusted?
- Expiration Date — When does the certificate expire?
- Days Remaining — Countdown to expiration
SSL status indicators
| Status | Meaning |
|---|---|
| Valid | Certificate is valid and not expiring soon |
| Expiring Soon | Certificate expires within your alert threshold (default: 14 days) |
| Expired/Invalid | Certificate has expired or is not trusted |
| No SSL | Site uses HTTP (not HTTPS) |
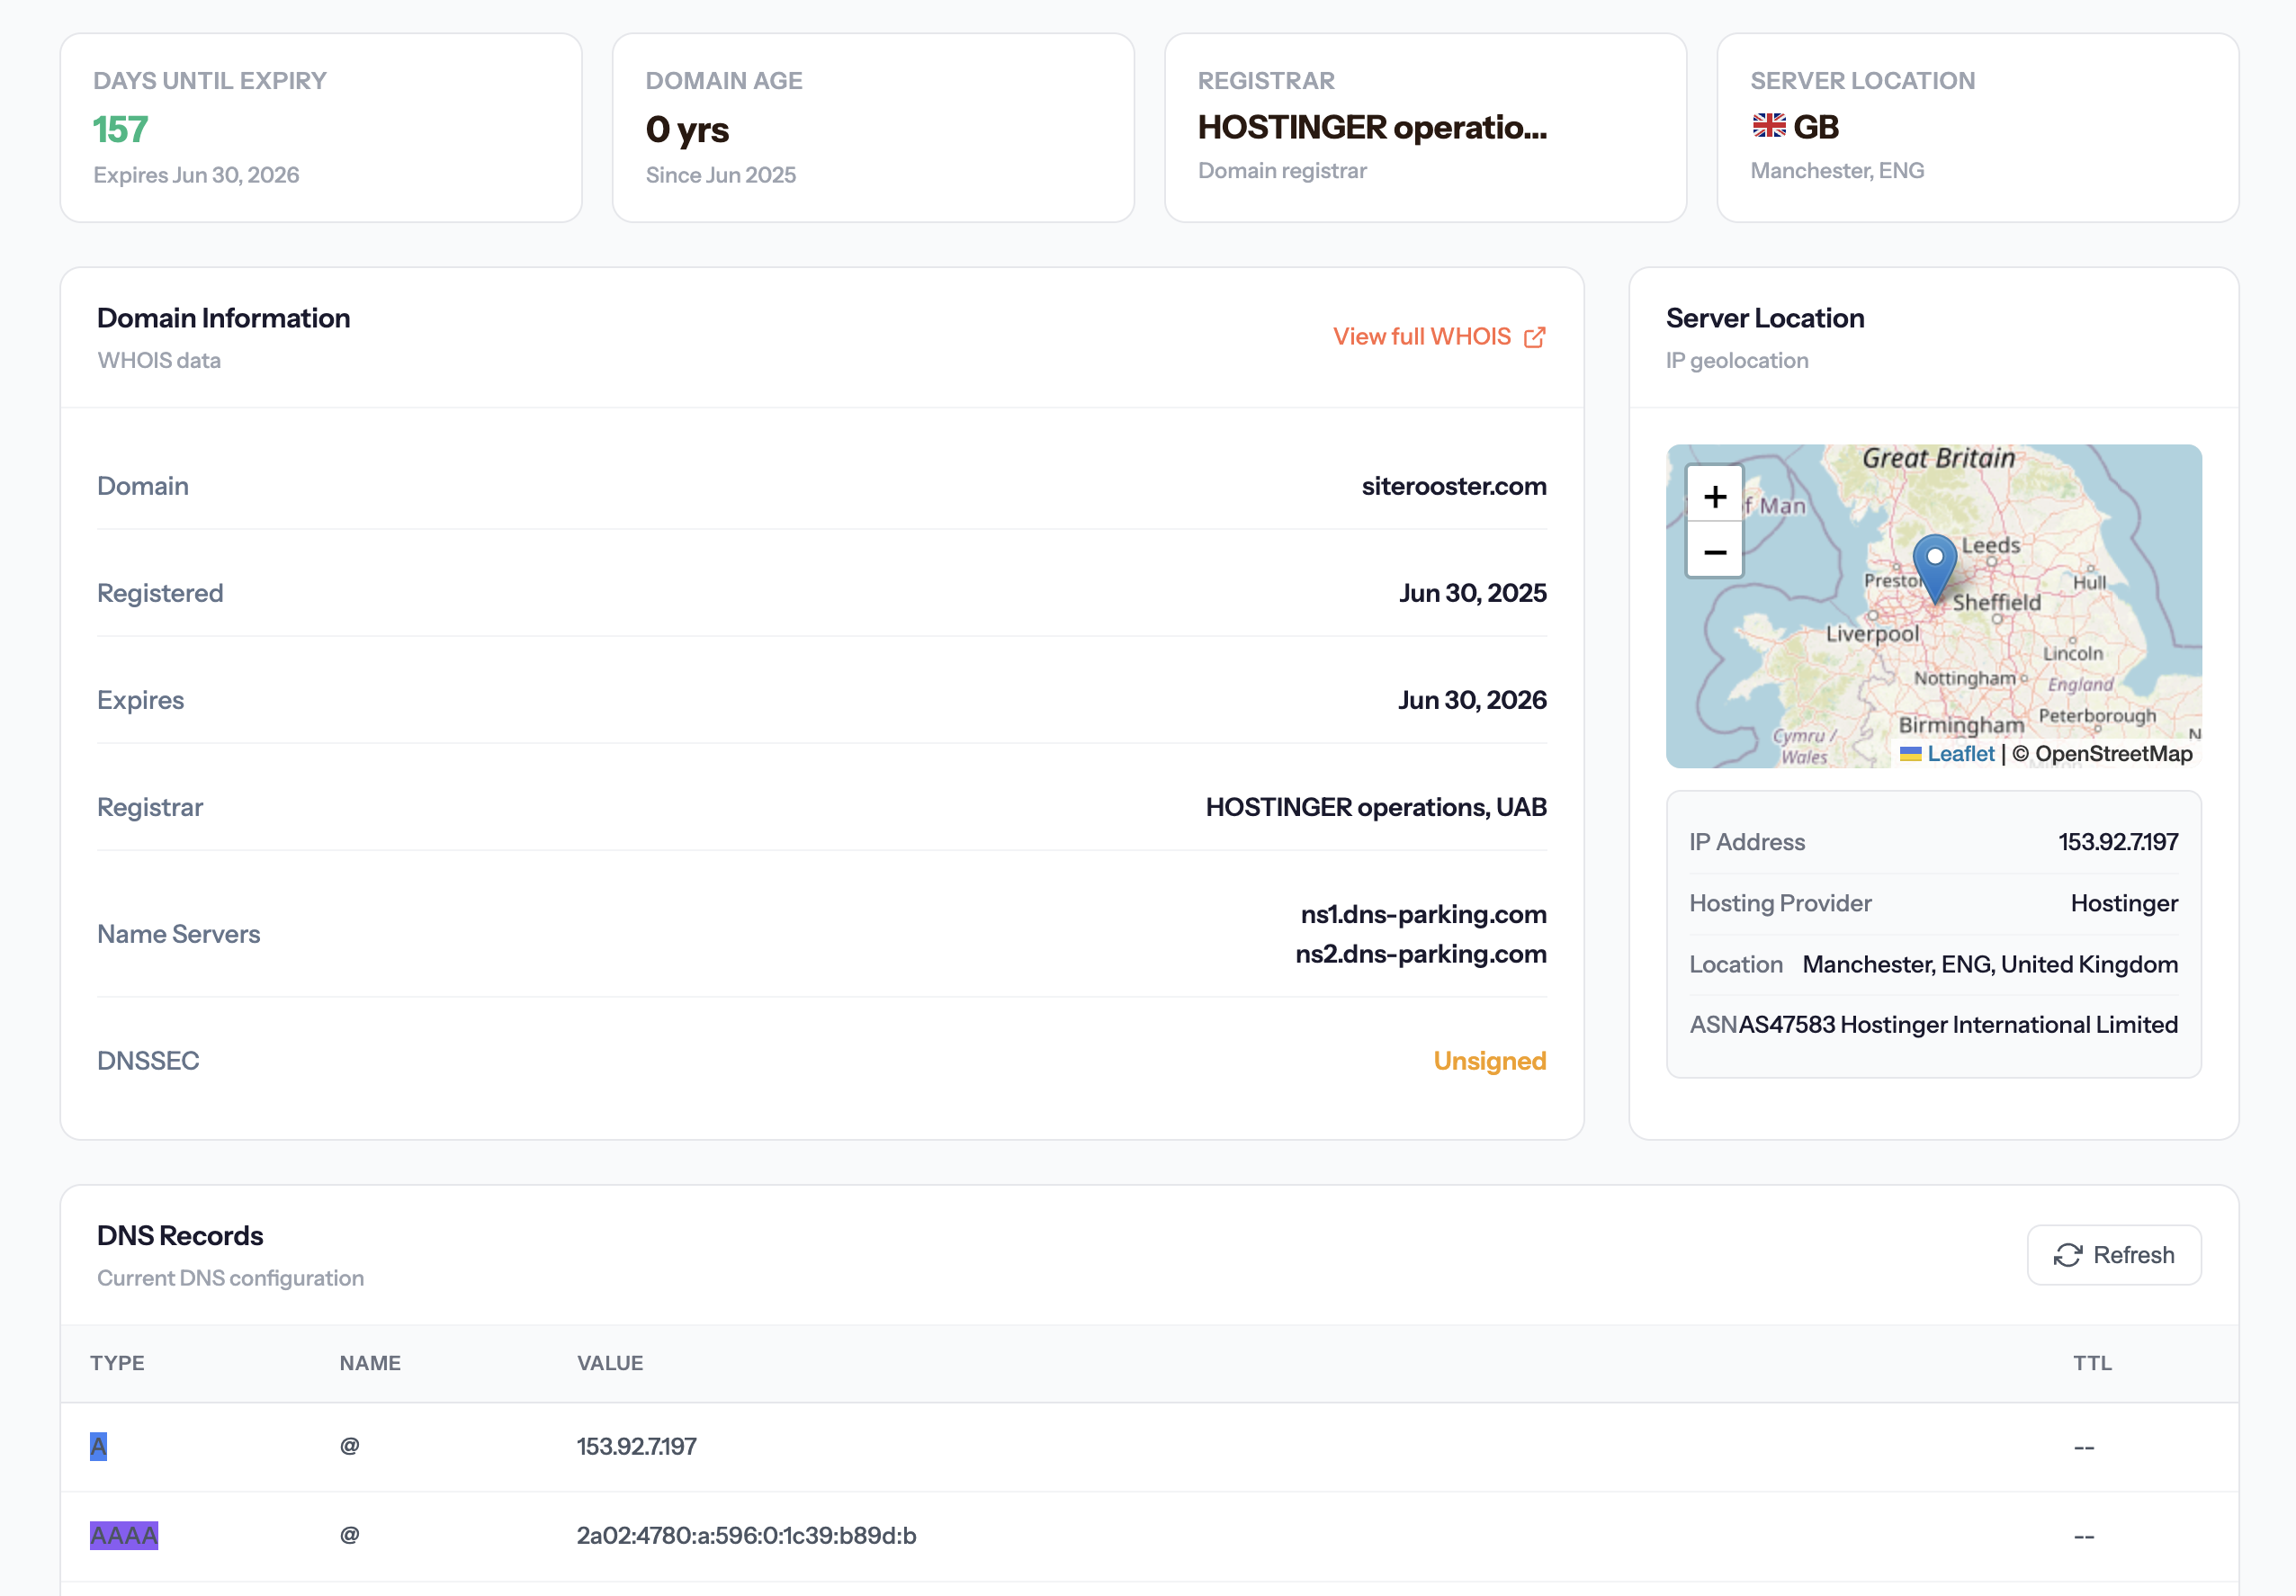
Domain expiration
SiteRooster monitors your domain registration expiration dates using WHOIS lookups.
How it works
- We perform WHOIS lookups to find your domain’s expiration date
- Checks run hourly to respect WHOIS server rate limits
- We support most major domain registrars and TLDs
Domain status display
On your dashboard and site detail pages, you’ll see:
- The exact expiration date
- A countdown showing days remaining
- Color-coded warnings as expiration approaches
Alert thresholds
| Monitor Type | Warning Threshold | Critical Threshold |
|---|---|---|
| SSL Certificate | 14 days | 7 days |
| Domain Expiration | 30 days | 14 days |
Content
Crawl your site, analyze performance, audit SEO, and explore internal links.
Crawling & Indexing
SiteRooster can crawl your websites to discover and index all your pages. This powers features like performance analysis, SEO audits, and internal link analysis.
How crawling works
- Starting from your homepage, we discover and follow internal links
- We respect your
robots.txtrules - Each page’s content, metadata, and links are indexed
- Subsequent crawls compare content to detect changes
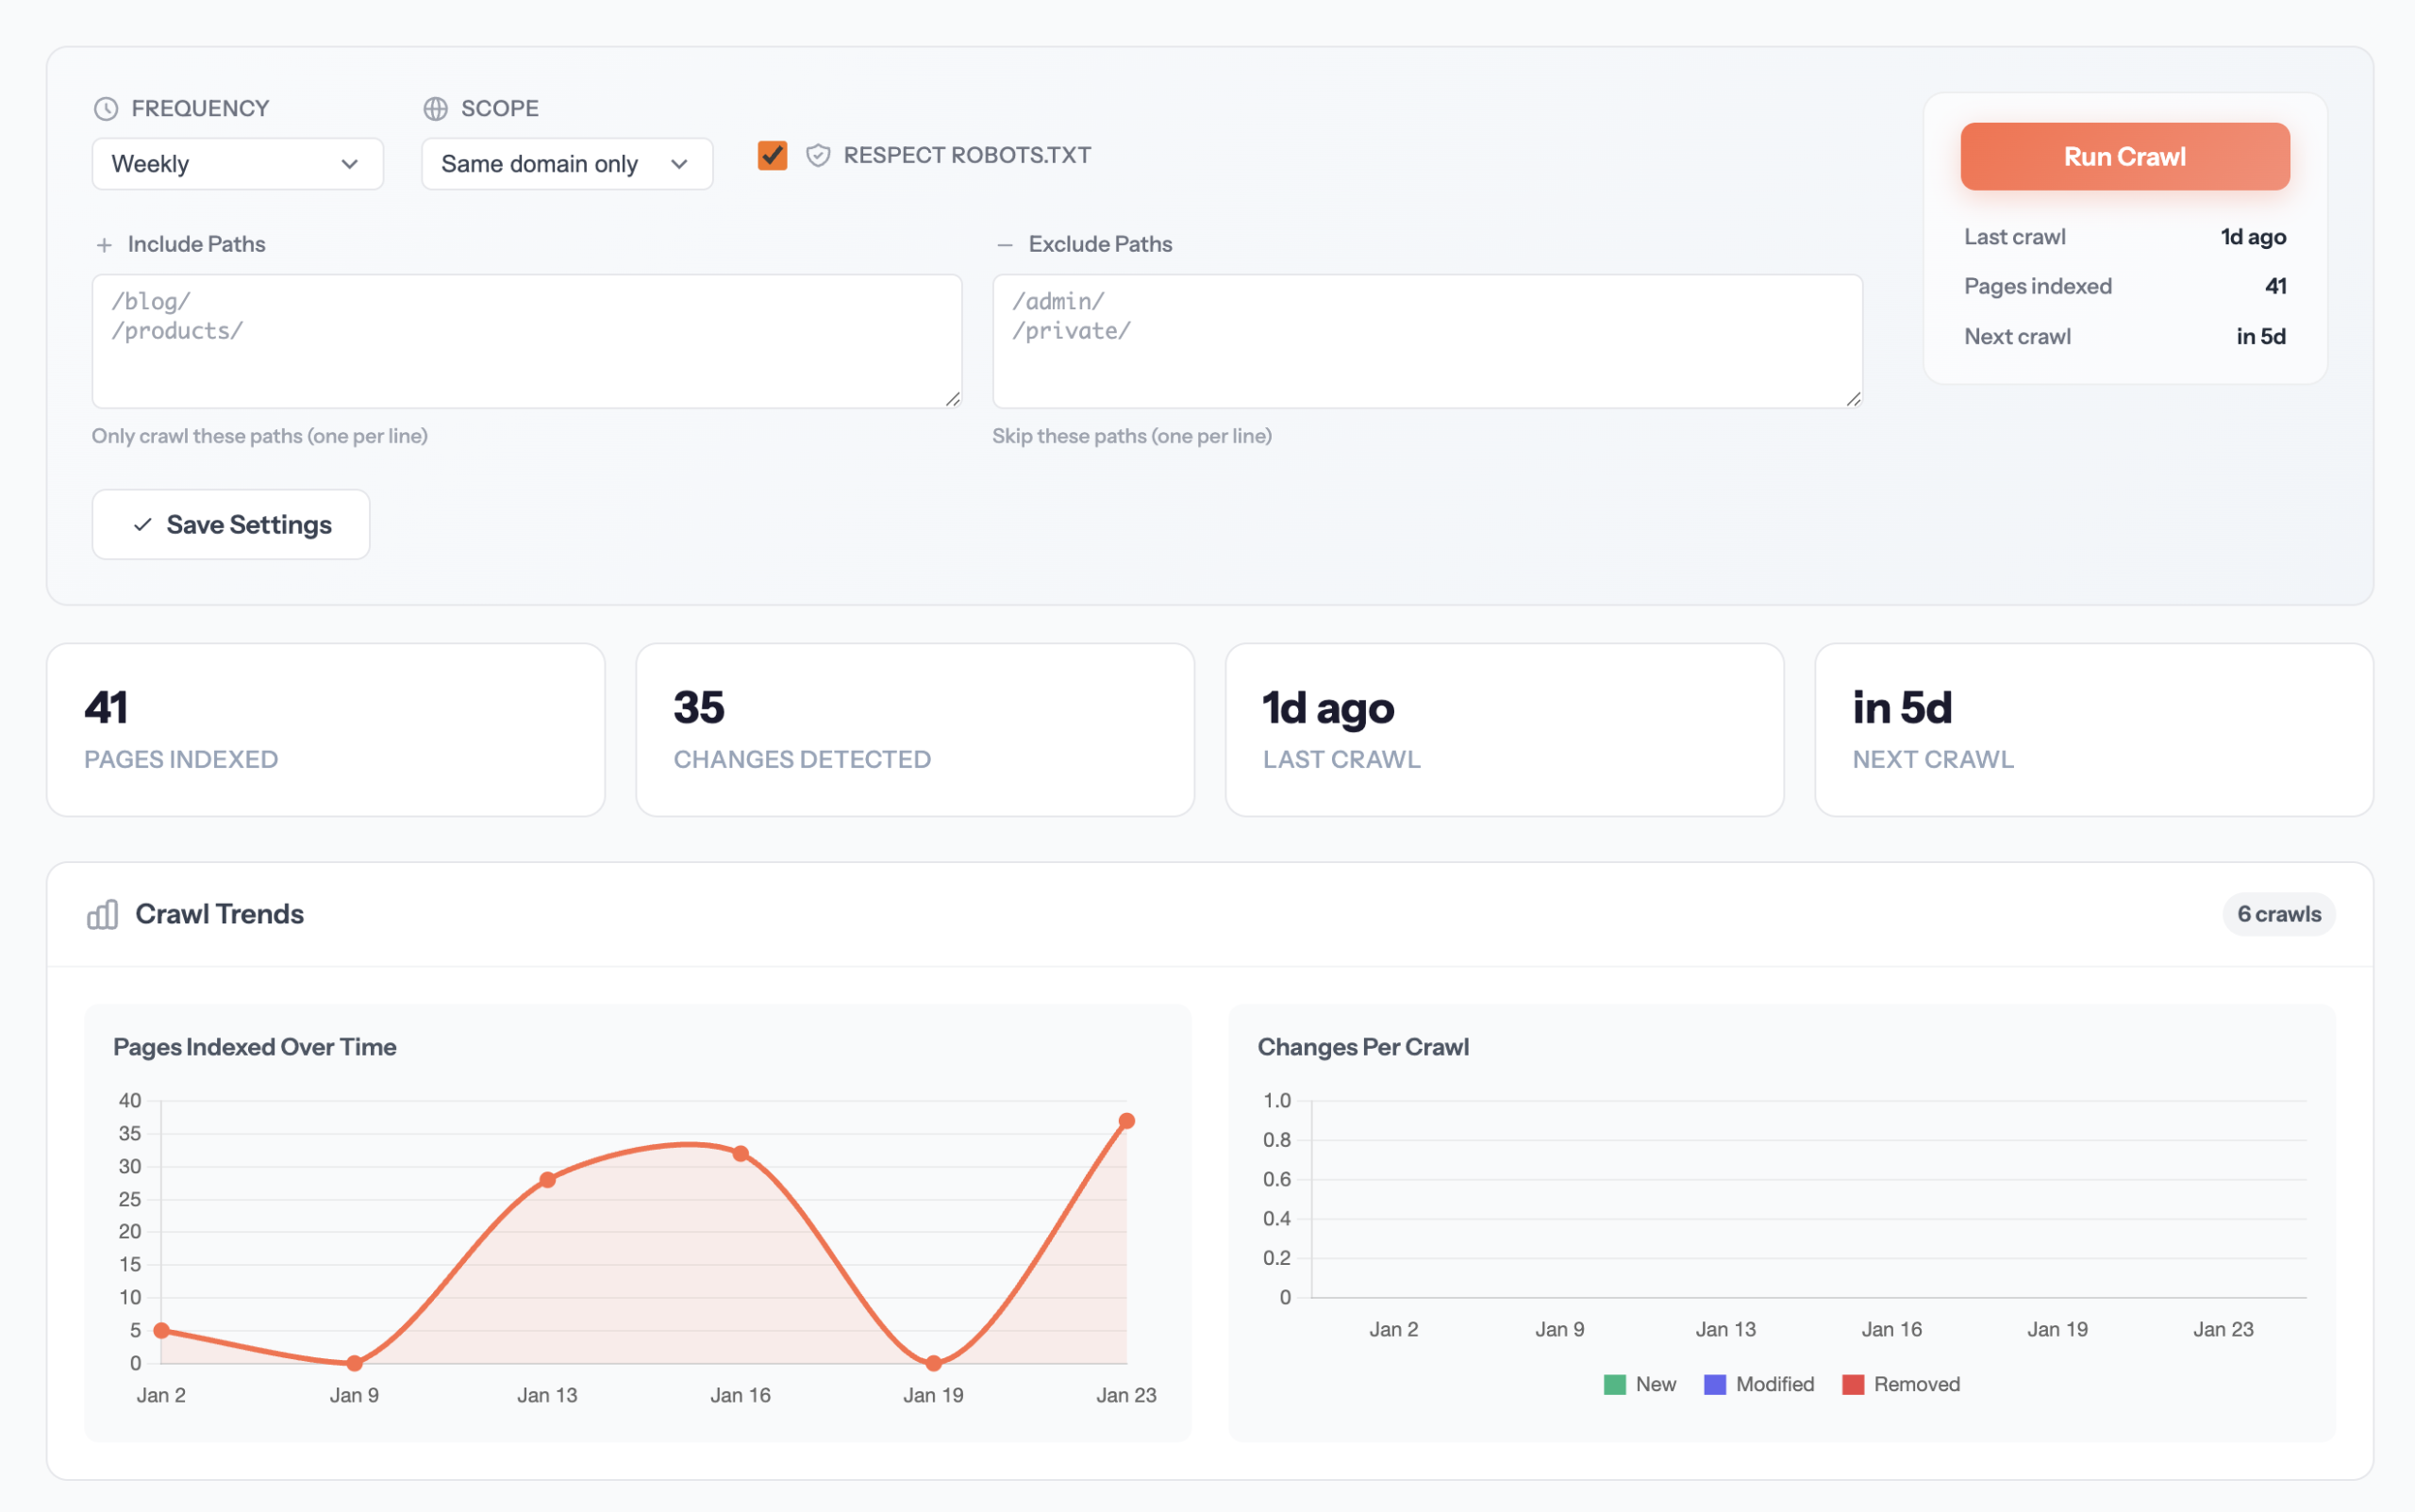
Starting a crawl
- Go to your site’s detail page
- Click Crawling & Indexing in the Content section
- Configure crawl settings (scope, page limit)
- Click Start Crawl
Crawl settings
- Scope — Same domain only, or include subdomains
- Page Limit — Maximum pages to crawl (based on your plan)
- Respect robots.txt — Follow or ignore robots directives
- Schedule — Set up automatic recurring crawls
Crawl limits by plan
| Plan | Max Pages | Auto-Crawl Frequency |
|---|---|---|
| Free | 10 | Weekly |
| Small | 100 | Weekly / Daily |
| Medium | 5,000 | Weekly / Daily |
| Enterprise | 10,000 | Weekly / Daily |
Performance
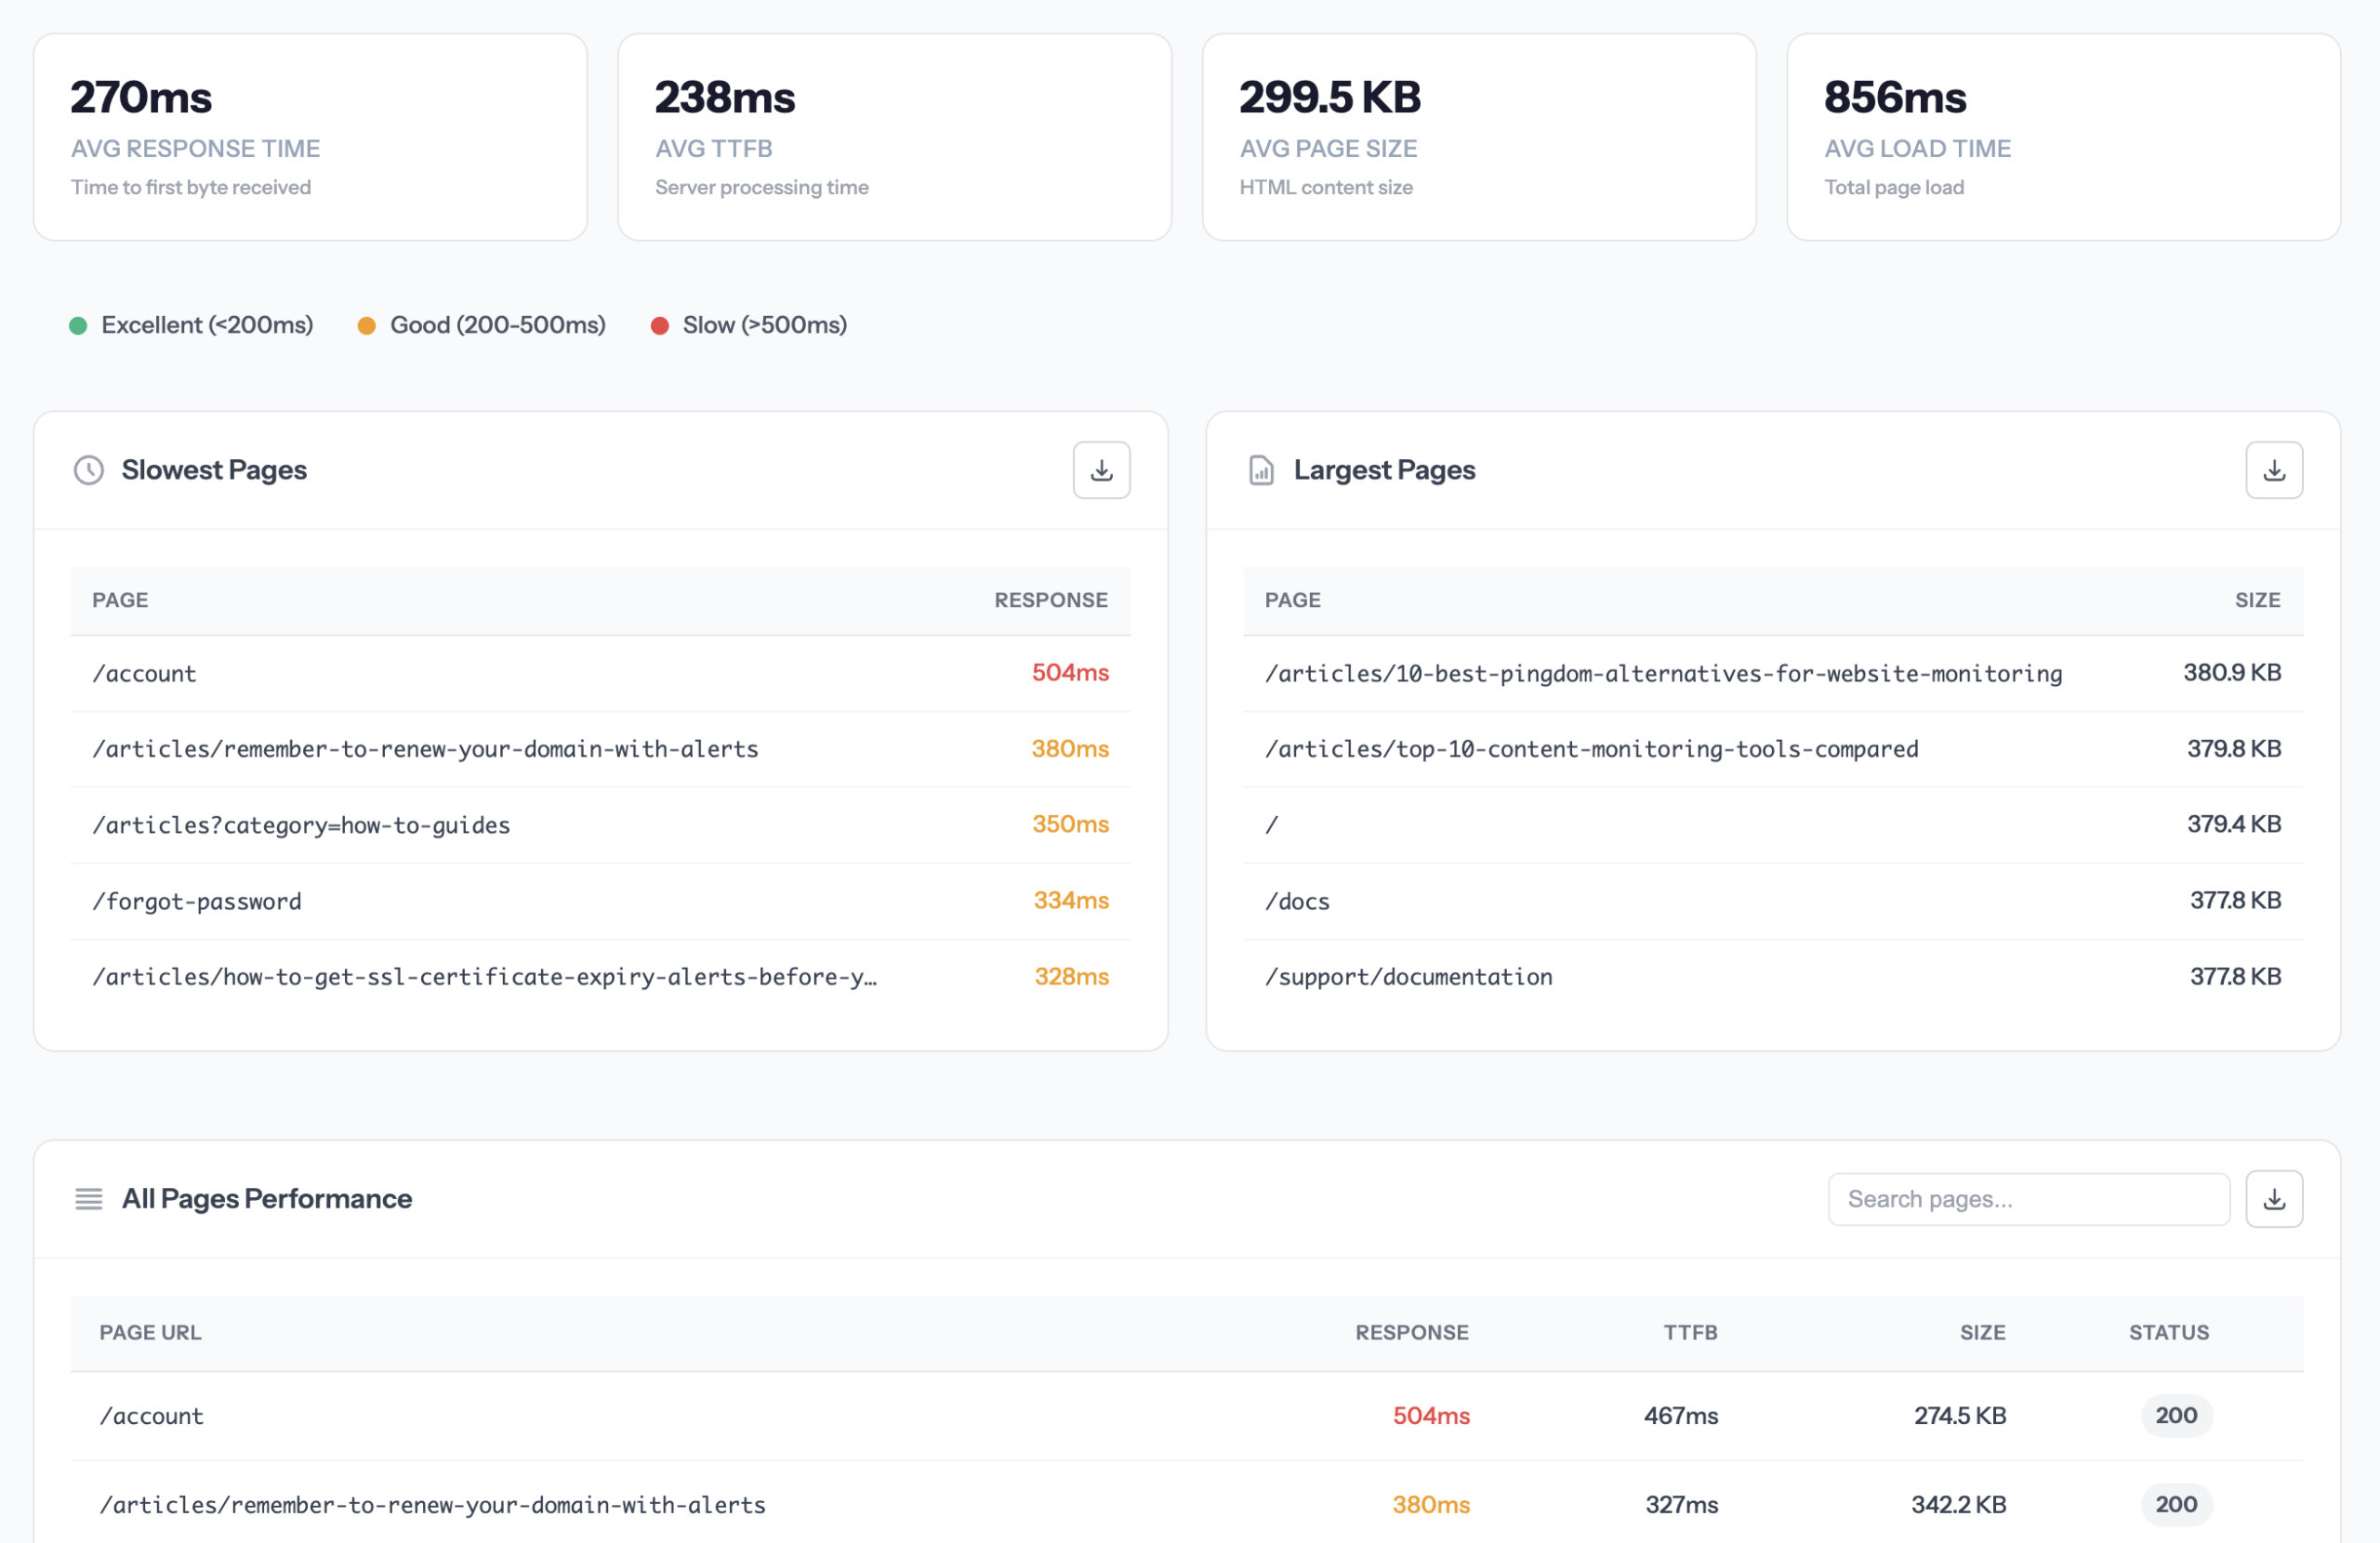
After crawling your site, the Performance section shows detailed speed metrics for every page discovered.
Performance metrics
At the top, you’ll see site-wide averages:
- Avg Response Time — How quickly pages respond to requests
- Avg TTFB — Time to First Byte (server processing time)
- Avg Page Size — HTML content size in KB
- Avg Load Time — Total page load time
Performance ratings
Response times are color-coded to help you quickly identify issues:
| Rating | Response Time | Meaning |
|---|---|---|
| Excellent | Under 200ms | Fast response, great user experience |
| Good | 200-500ms | Acceptable performance |
| Slow | Over 500ms | May impact user experience |
Slowest & Largest Pages
Two quick-reference tables show your problem pages:
- Slowest Pages — Pages with the longest response times
- Largest Pages — Pages with the biggest file sizes
Use these to prioritize optimization efforts.
All Pages Performance
The full table shows every crawled page with:
- Page URL
- Response time
- TTFB (Time to First Byte)
- Page size
- HTTP status code
Use the search box to find specific pages, and click the download button to export as CSV.
SEO Health
The SEO Health section analyzes your crawled pages for common SEO issues and provides an overall health score.
SEO Score
Your site receives an overall SEO health score from 0-100% based on the number and severity of issues found. The score is displayed with a color-coded gauge:
- 80-100% — Excellent SEO health
- 60-79% — Good, but room for improvement
- 40-59% — Fair, significant issues to address
- 0-39% — Poor, immediate attention needed

Issues tracked
SiteRooster checks for these common SEO problems:
| Issue Type | What We Check |
|---|---|
| Title Issues | Missing titles, duplicate titles, titles too long/short |
| Meta Description | Missing meta descriptions, too long/short descriptions |
| H1 Issues | Missing H1 tags, multiple H1 tags on same page |
| Missing Canonical | Pages without a canonical URL tag |
| Missing Alt Text | Images without alt attributes |
All SEO Issues table
The detailed issues table shows every page with problems:
- Page URL — The affected page
- Issue Type — Badge showing the issue category
- Details — Specific information (e.g., “Meta too long (183 chars)”)
- Actions — Quick link to re-check the page
Use the dropdown filter to view specific issue types, and search to find particular pages.
Internal Linking
The Internal Linking section provides deep analysis of how your pages link to each other — essential for SEO and user navigation.
Link Explorer
The main table shows all internal links discovered during crawling:
- Target URL — The page being linked to
- Source Page — Where the link appears
- Anchor Text — The clickable link text
- Status Flags — 404 errors, redirects, nofollow tags
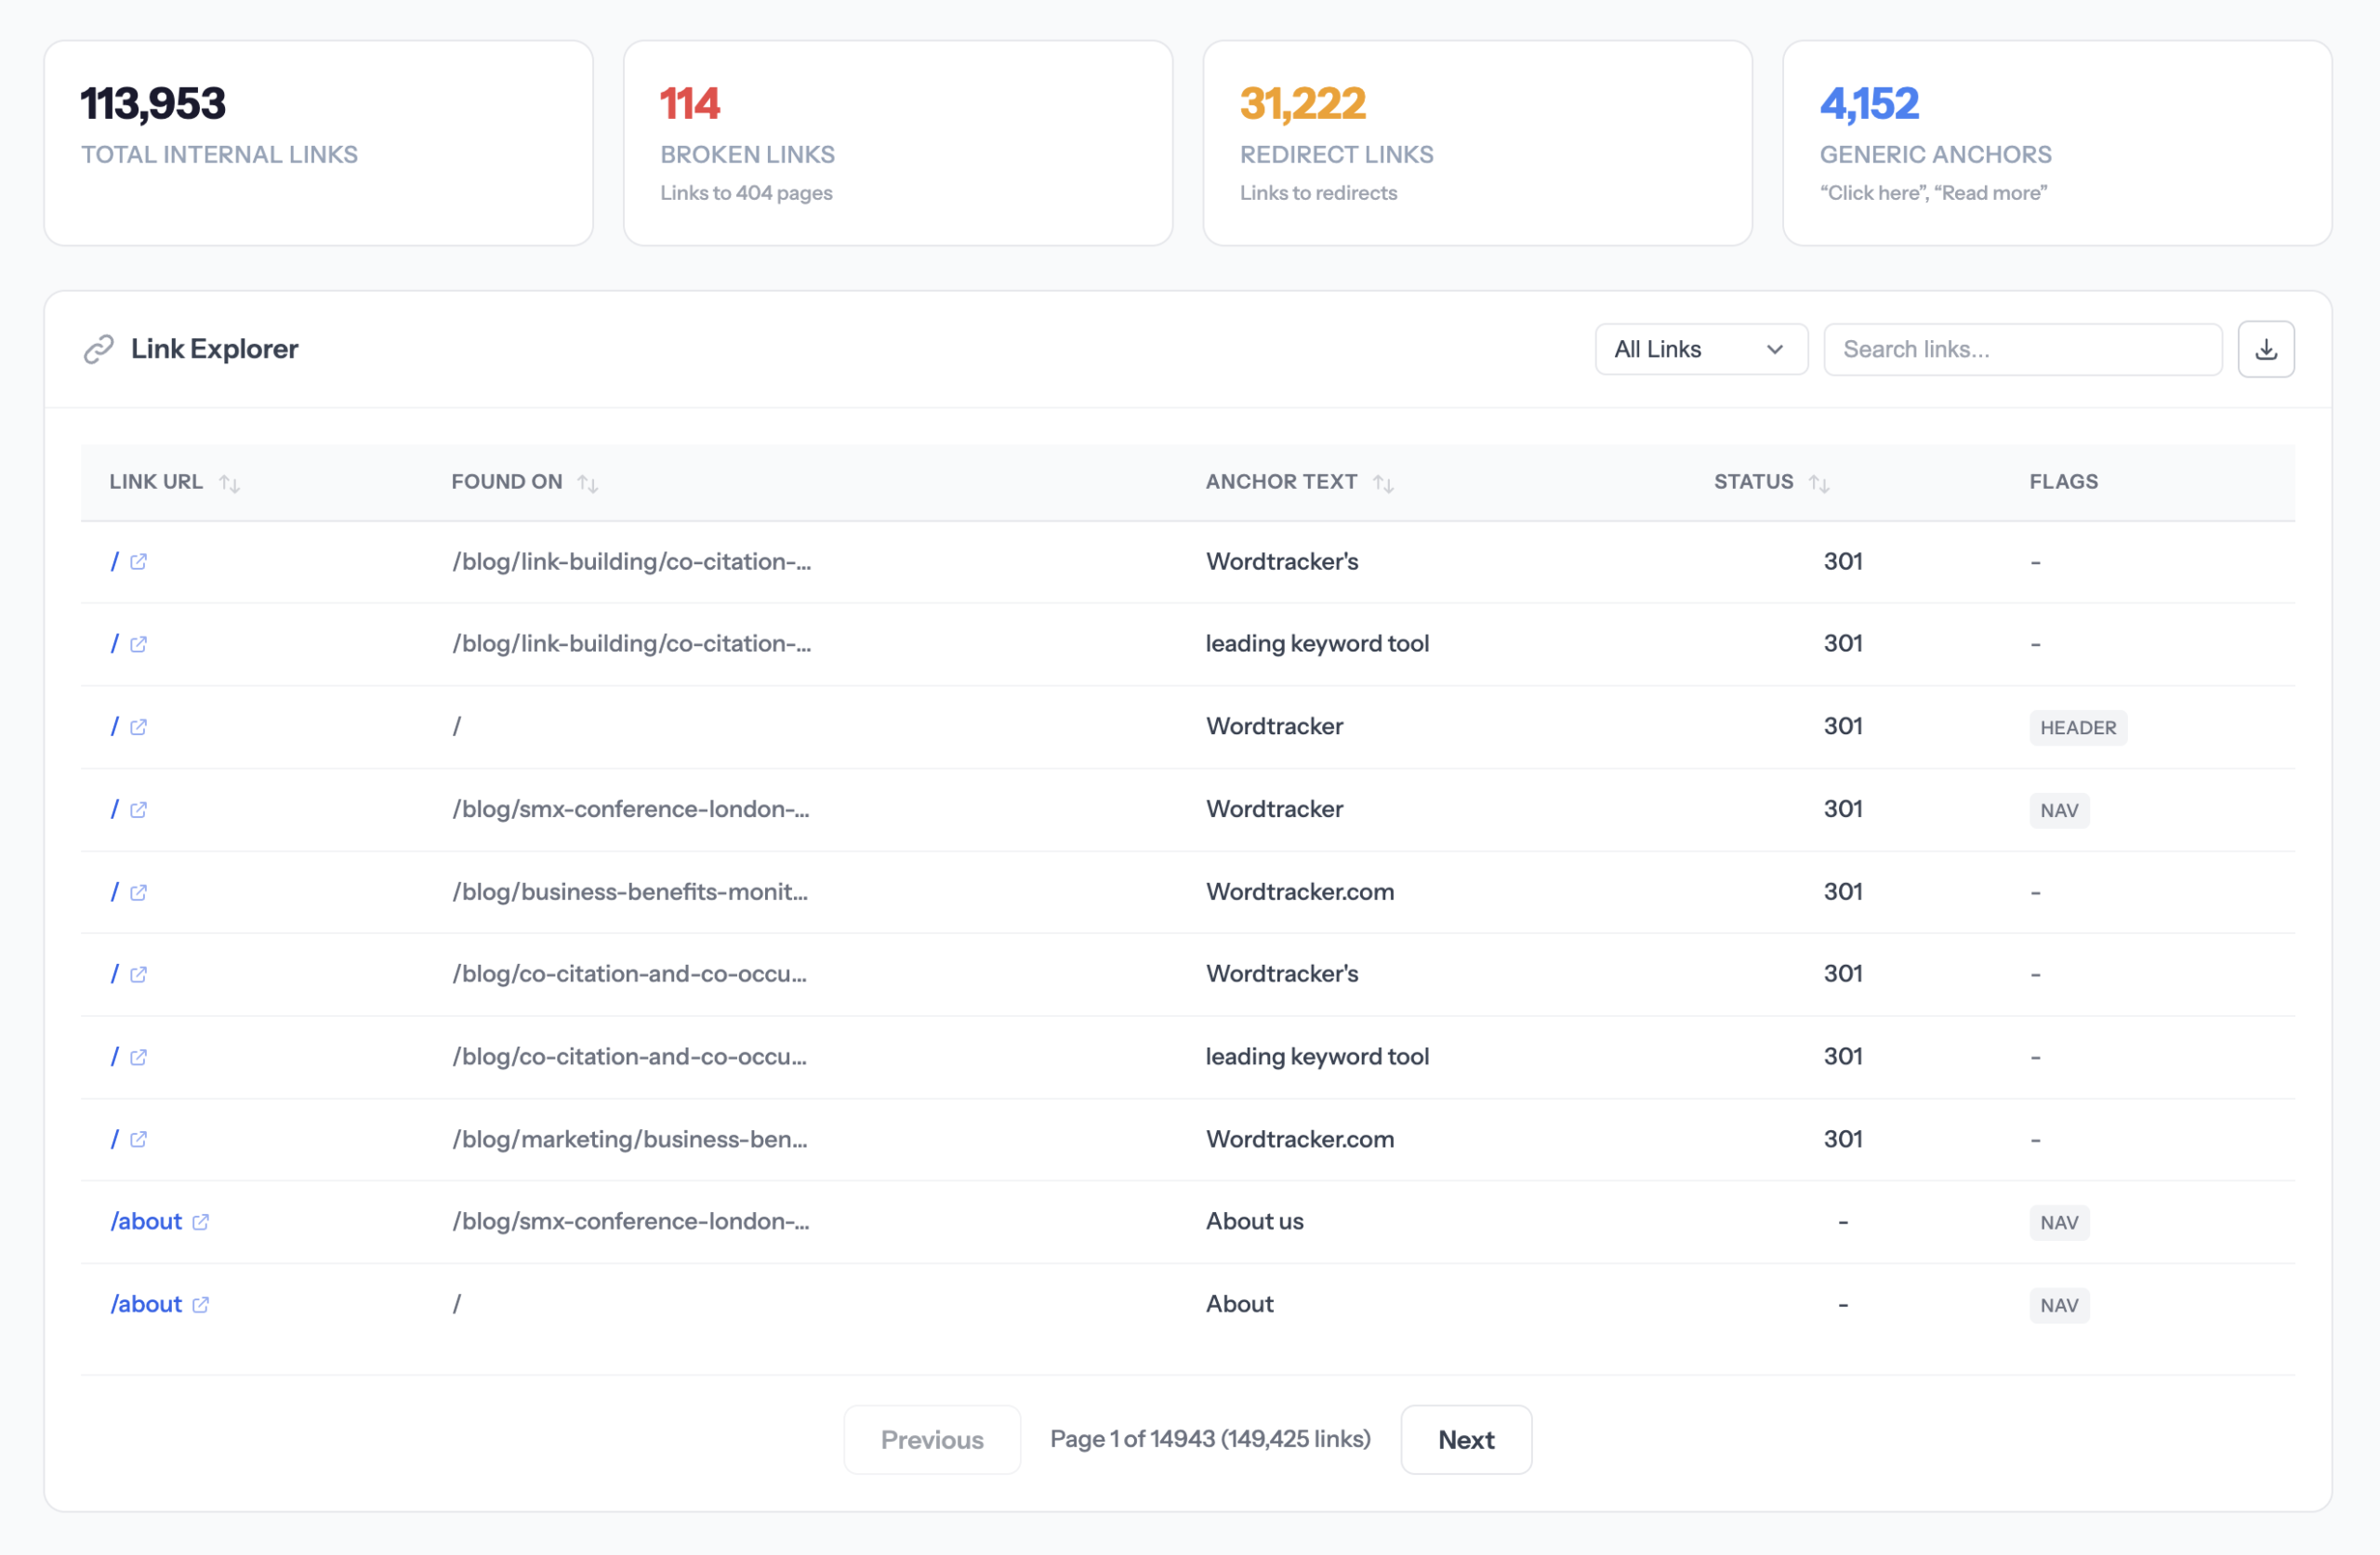
Key metrics
- Total Internal Links — All internal links found
- Orphan Pages — Pages with no internal links pointing to them
- Broken Links — Internal links pointing to 404 pages
- Redirected Links — Links that go through redirects
Anchor Text Analysis
See all anchor text used across your site:
- Most common anchor texts
- Generic anchors to improve (“click here”, “read more”)
- Search for specific anchor text
Link Opportunities
Find pages where you could add internal links:
- Enter a target page URL you want more links to
- SiteRooster scans your content for matching text
- See suggestions for pages where you could add links
Monitors
Track specific keywords and page changes across your site.
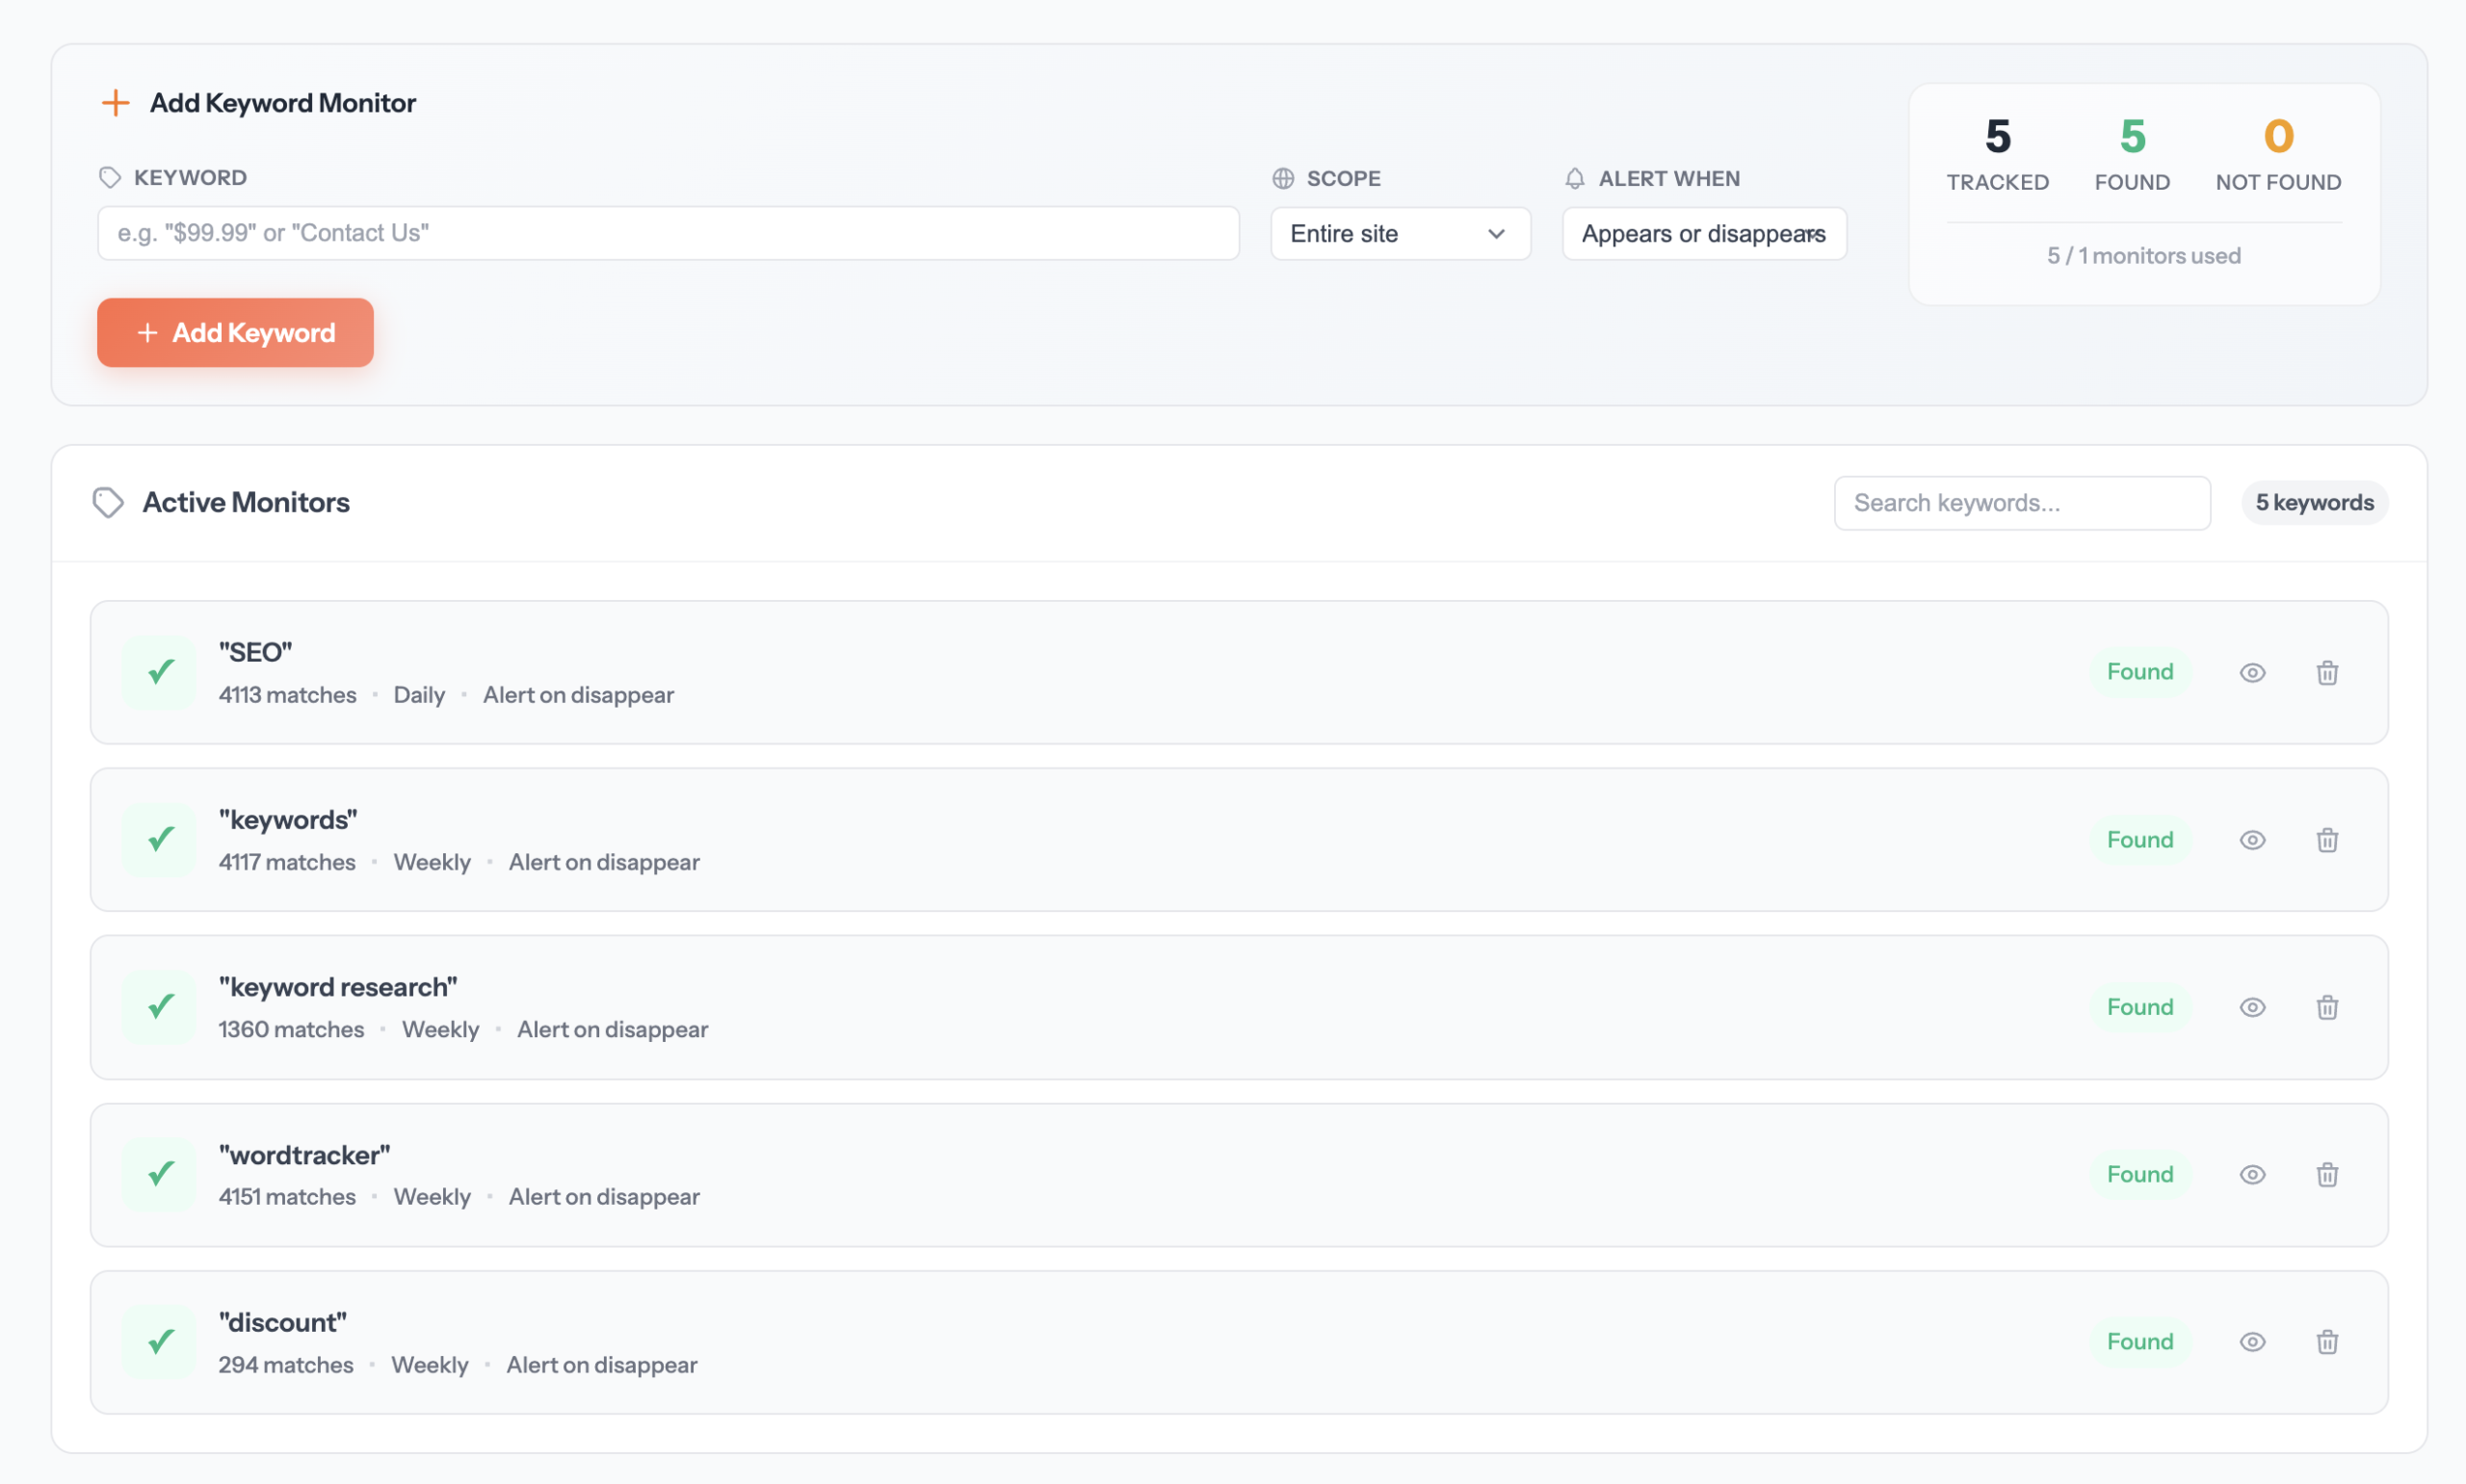
Keyword monitors
Keyword monitors track specific words or phrases across your site and alert you when they appear or disappear.
Use cases
- Brand monitoring — Know if your brand name is removed from a partner’s site
- Error detection — Get alerted if “error”, “404”, or “maintenance” appears
- Competitor tracking — Monitor competitor sites for specific product mentions
- Compliance — Ensure required legal text remains on your pages
Creating a keyword monitor
- Go to your site’s Keywords section under Monitors
- Enter the keyword or phrase to track
- Choose the scope: entire site or specific pages
- Select alert type: Appears or Disappears
- Set check frequency
- Click Add Keyword
Keyword limits by plan
| Plan | Keyword Monitors |
|---|---|
| Free | 1 |
| Small | 5 |
| Medium | 50 |
| Enterprise | 200 |
Page change monitors
Page monitors track specific URLs for any content changes. When the page content changes, you’ll be notified.
Use cases
- Competitor pricing — Monitor competitor pricing pages
- Legal documents — Track changes to terms of service or privacy policies
- News/updates — Know when a page is updated
- Availability — Monitor product pages for stock changes
Creating a page monitor
- Go to your site’s Pages section under Monitors
- Enter the page URL to monitor
- Optionally add a CSS selector to monitor specific content
- Set check frequency
- Click Add Page
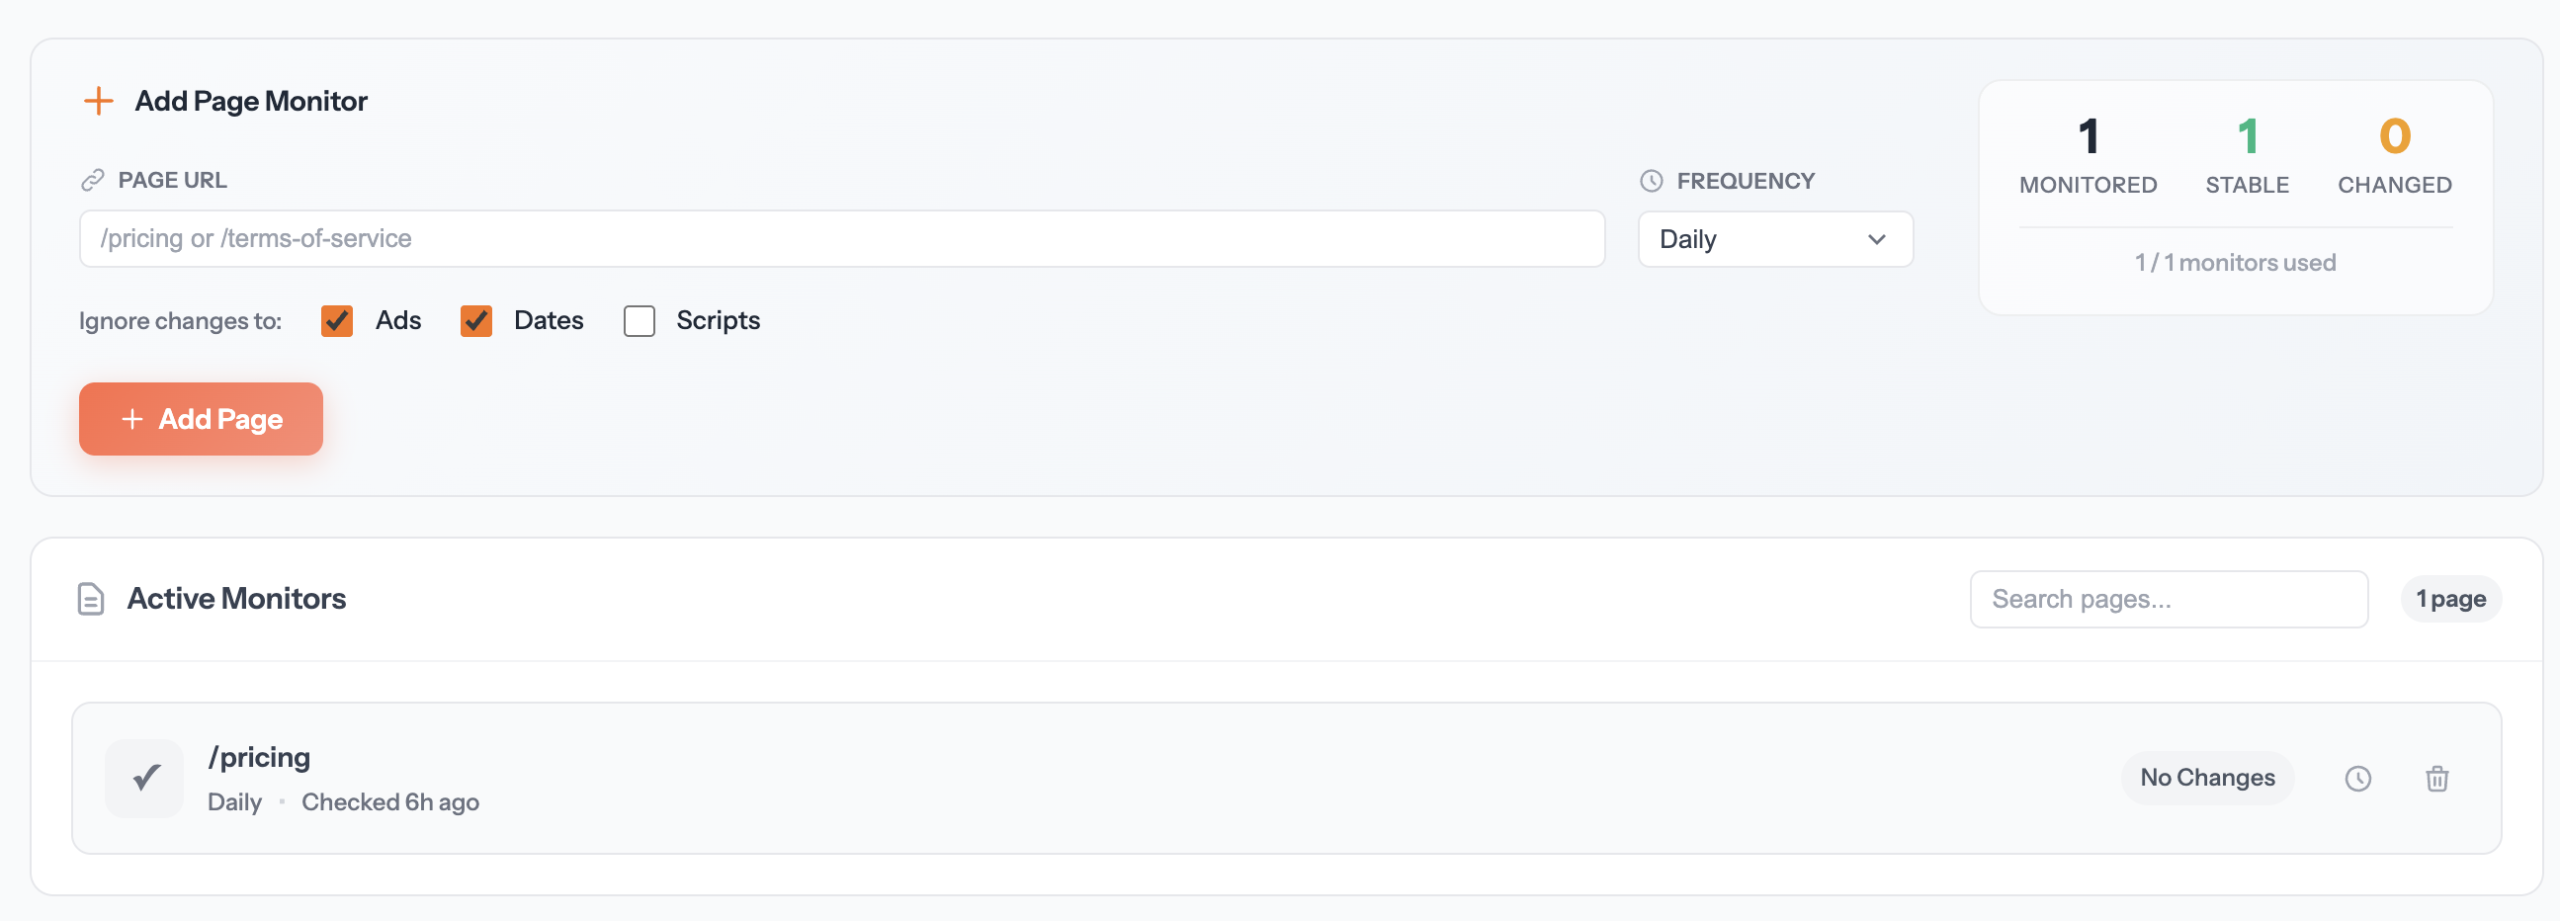
CSS selector filtering
Use CSS selectors to focus on specific parts of a page and reduce false positives:
#main-content — Only monitor the main content area
.pricing-table — Only monitor elements with this class
article — Only monitor article elements
This helps ignore dynamic elements like ads, timestamps, or random content.
Page monitor limits by plan
| Plan | Page Monitors |
|---|---|
| Free | 1 |
| Small | 10 |
| Medium | 100 |
| Enterprise | 500 |
Visibility
Track how your brand appears across AI platforms and search engines.
AI Engines
Monitor how your brand is mentioned and represented across major AI platforms like ChatGPT, Claude, Gemini, and Perplexity.
Why AI visibility matters
As more people use AI assistants to find information, it’s crucial to know:
- Is your brand being mentioned in AI responses?
- How accurately is your brand being described?
- Are competitors being recommended instead?
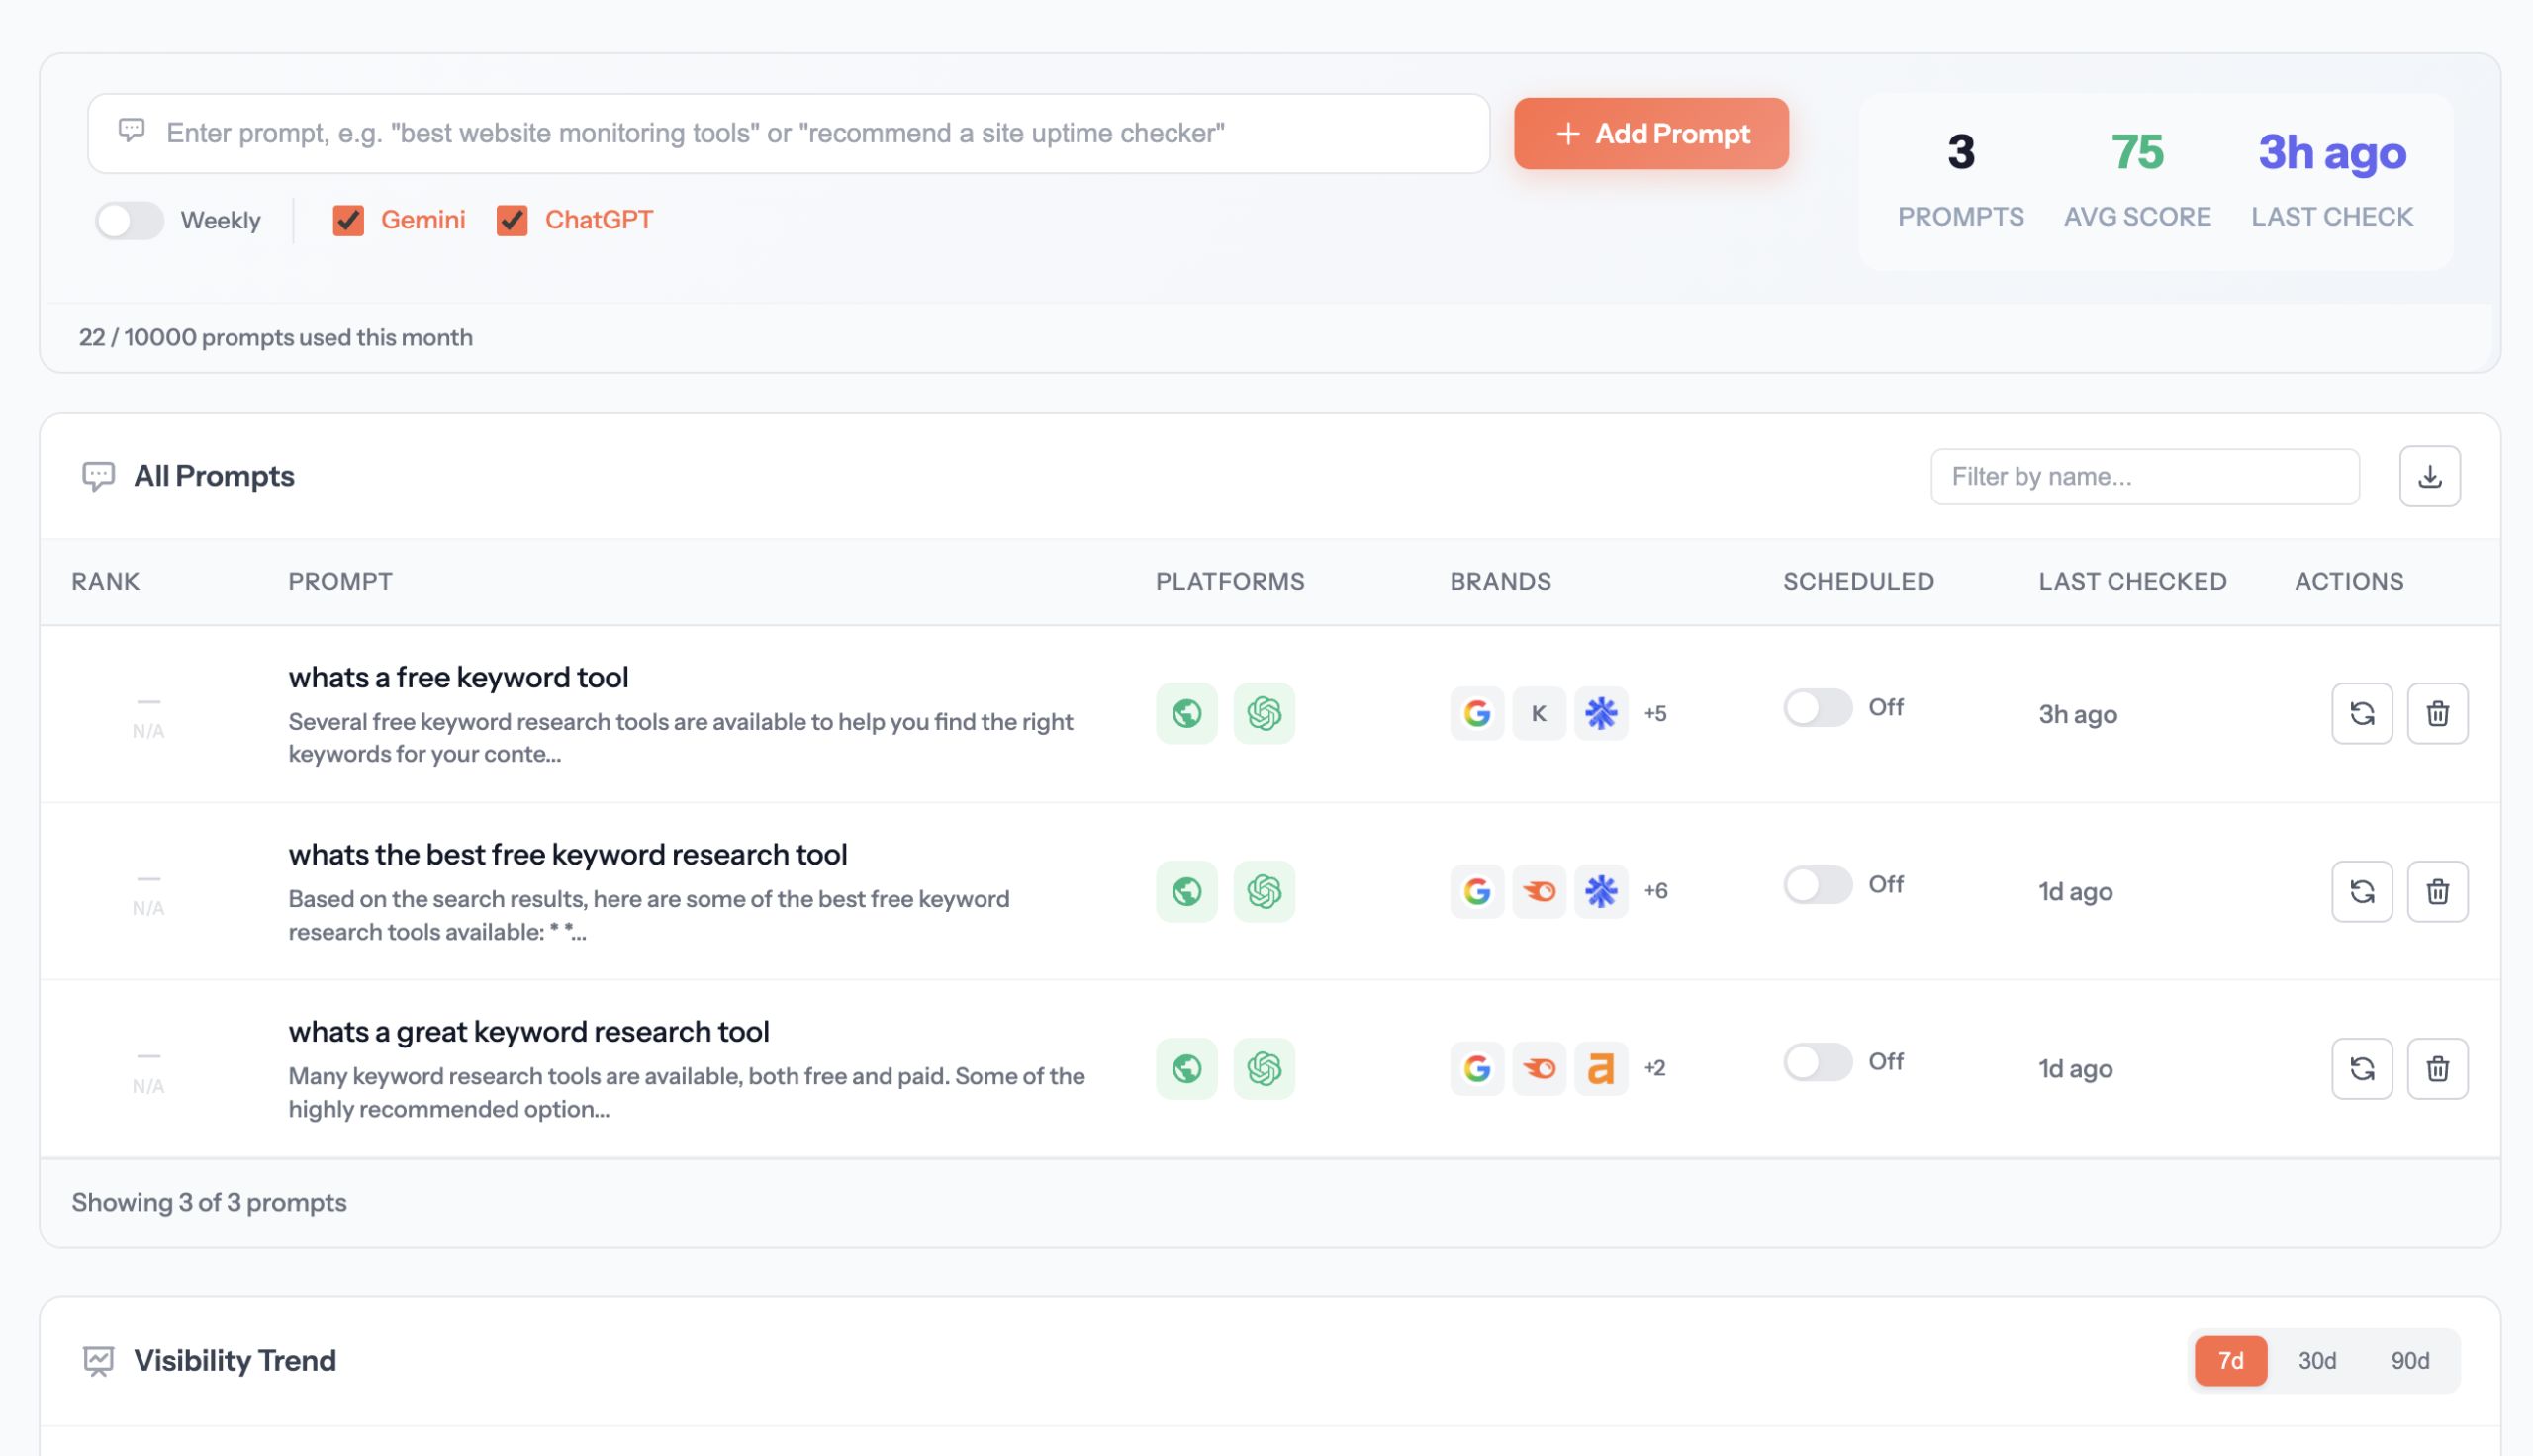
Setting up AI tracking
- Go to your site’s AI Engines section under Visibility
- Add prompts that users might ask about your industry
- Set check frequency (weekly recommended)
- View results showing which AI platforms mention your brand
Tracked platforms
- ChatGPT — OpenAI’s conversational AI
- Claude — Anthropic’s AI assistant
- Gemini — Google’s AI platform
- Perplexity — AI-powered search engine
Understanding results
For each prompt, you’ll see:
- Visibility Score — How prominently your brand appears (0-100%)
- Mentioned — Whether your brand was mentioned
- Sentiment — Positive, neutral, or negative context
- Competitors — Other brands mentioned in the response
Search Engines
Track your website’s ranking position on Google and Bing for specific keywords.
How it works
- Add keywords you want to track rankings for
- Select target location (country/region)
- Choose which search engines to track (Google, Bing, or both)
- SiteRooster checks your position in the top 20 results
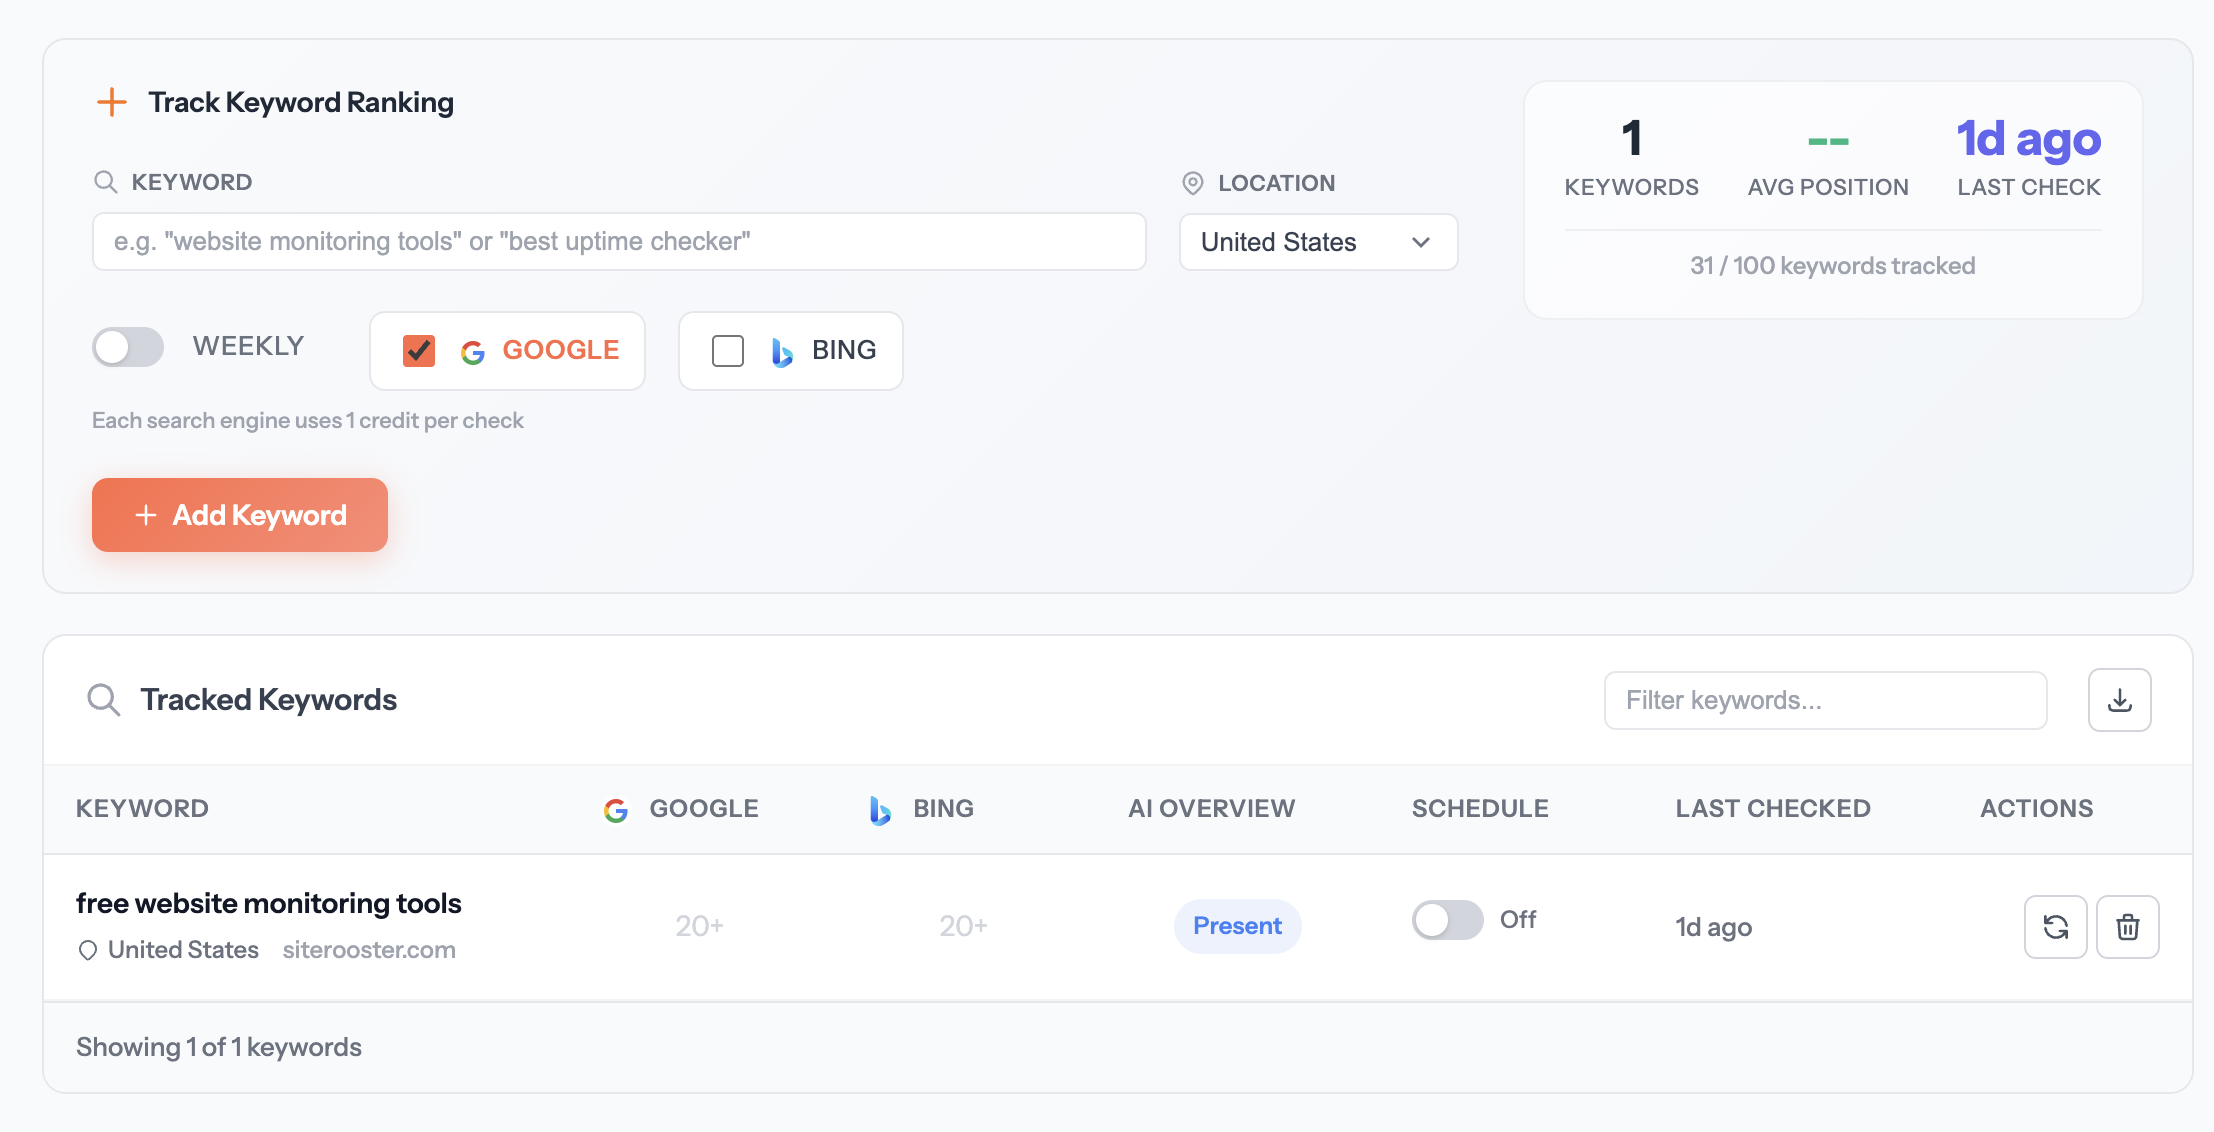
Adding a tracked keyword
- Go to Search Engines under Visibility
- Enter your target keyword
- Select the location (e.g., United States, United Kingdom)
- Choose search engines: Google, Bing, or both
- Set check schedule (weekly recommended)
- Click Add Keyword
Understanding positions
- #1-10 — First page of results (great visibility)
- #11-20 — Second page (limited visibility)
- 20+ — Not found in top 20 results
- Arrows — Show position change since last check (↑ improved, ↓ dropped)
Google AI Overview
For Google searches, we also detect if your site appears in the AI Overview (the AI-generated summary at the top of search results). This is increasingly important for visibility.
Credits system
SERP tracking uses credits from your monthly allowance:
- 1 credit = 1 keyword check on 1 search engine
- Tracking both Google AND Bing = 2 credits per keyword
| Plan | Monthly SERP Credits |
|---|---|
| Free | 10 |
| Small | 250 |
| Medium | 2,500 |
| Enterprise | 10,000 |
Citations
Track when and where AI platforms cite your website as a source in their responses.
What are AI citations?
When AI platforms like Perplexity or Google’s AI Overview provide answers, they often cite sources. Citations show which websites the AI used to generate its response.
Why citations matter
- Authority — Being cited indicates your content is trustworthy
- Traffic — Users may click through to cited sources
- Brand awareness — Your brand appears alongside the AI response
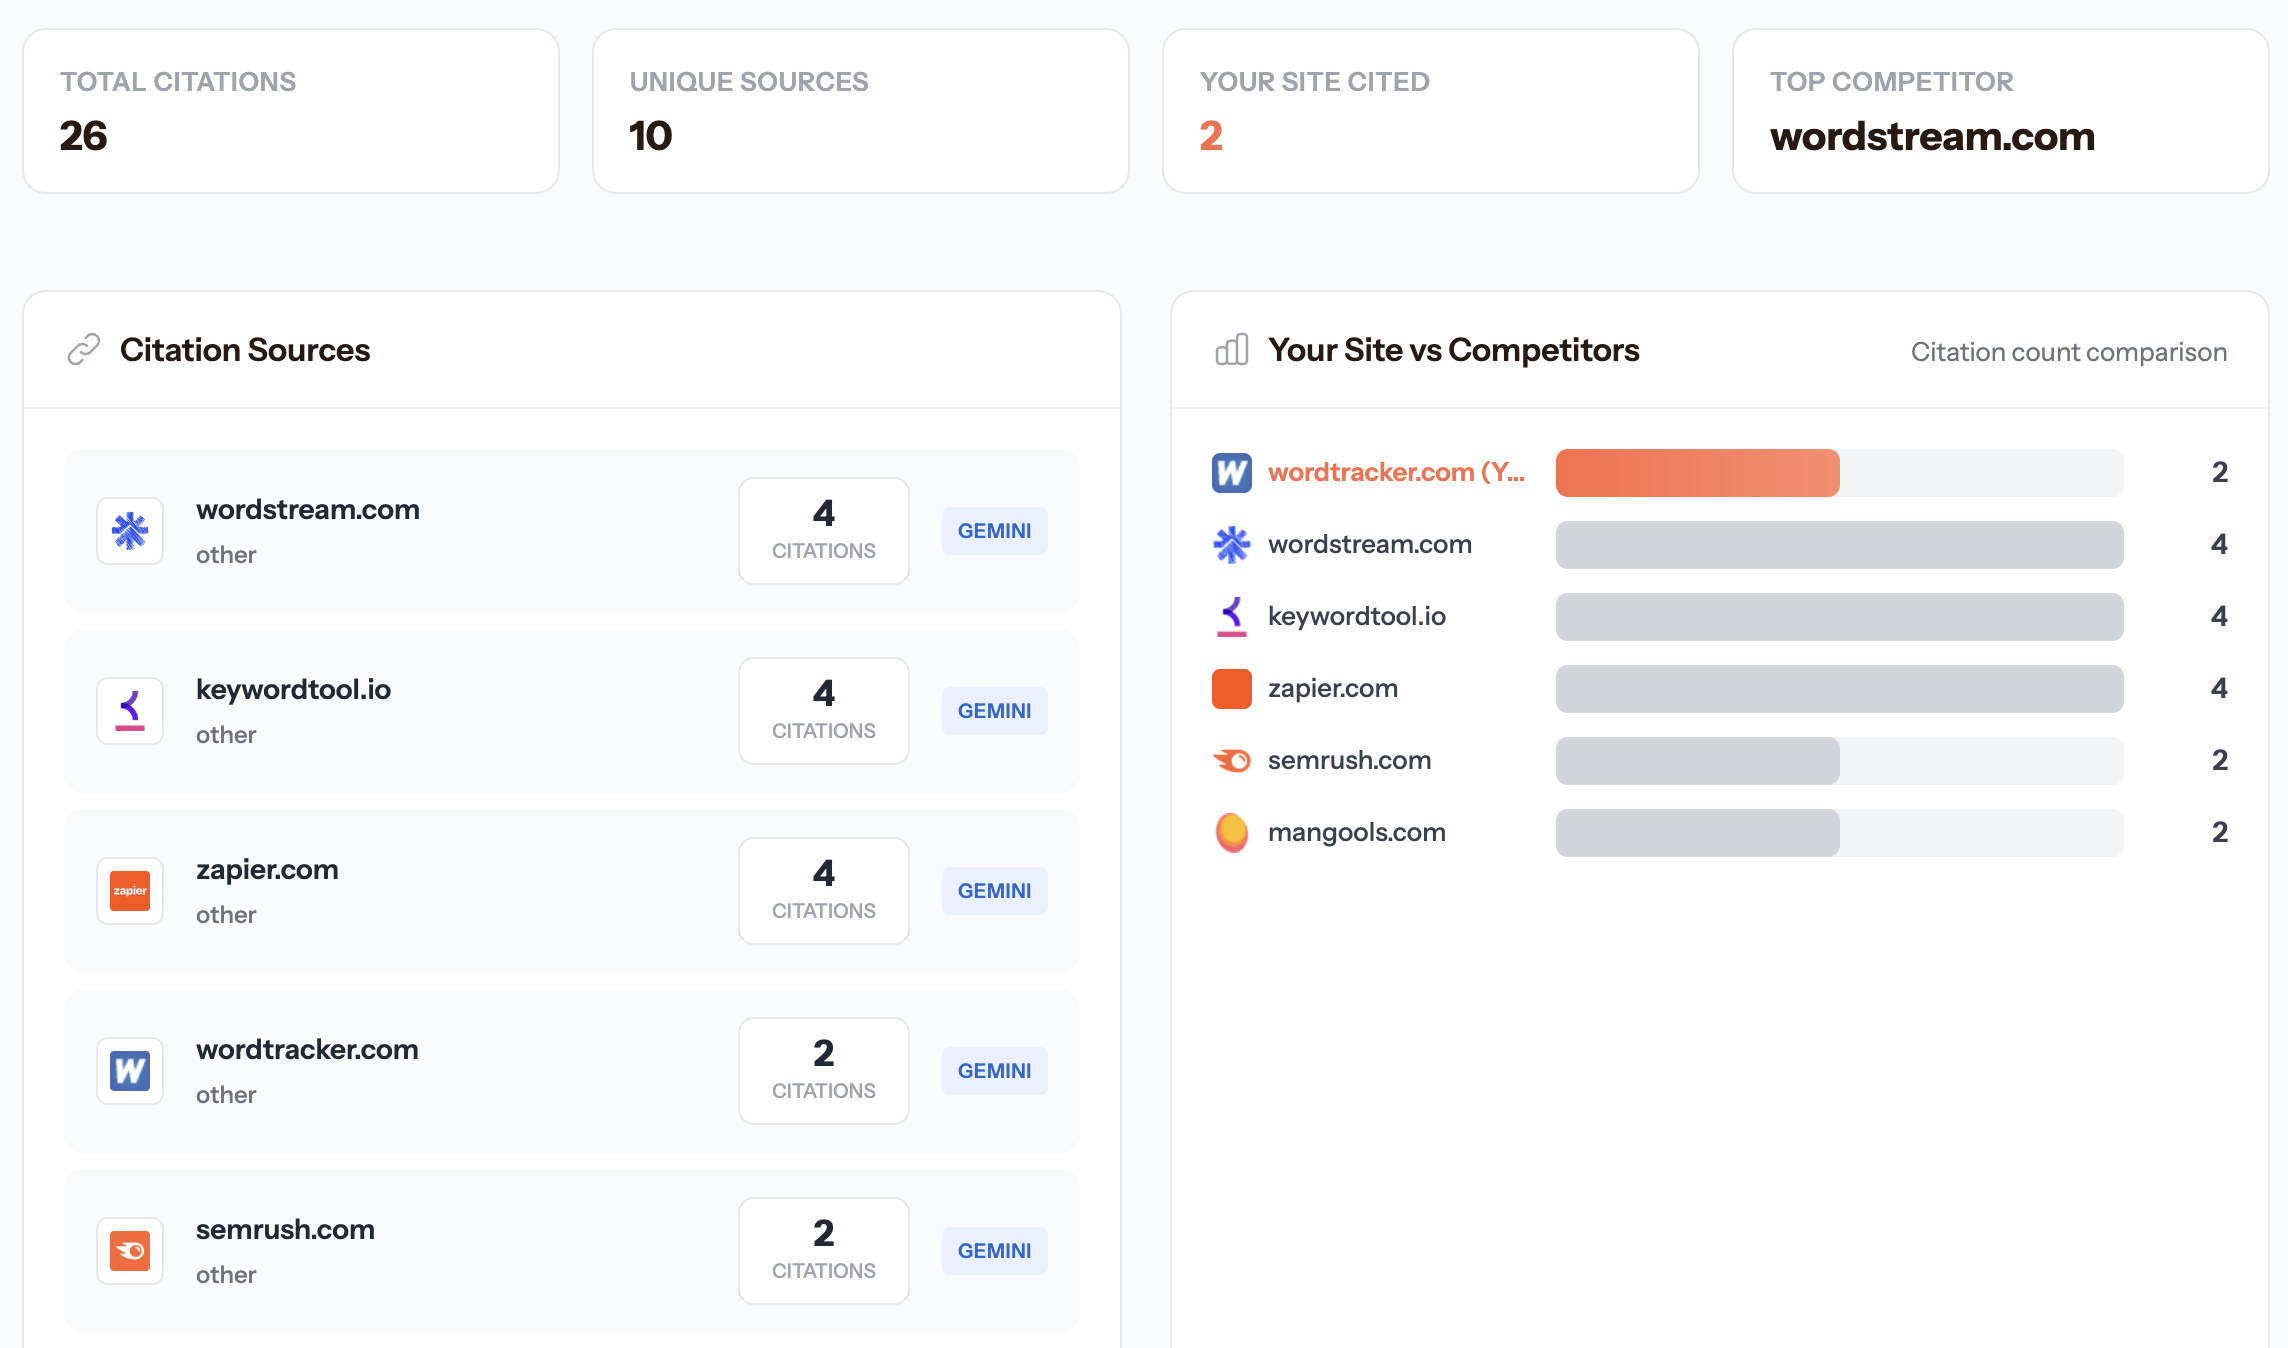
Citation analysis shows
- Citation count — How often your site is cited
- Platforms — Which AI platforms cite you most
- Cited pages — Which of your pages are being referenced
- Competitor comparison — How your citations compare to competitors
Settings
Configure notifications and public status pages.
Notifications
Get alerted when something needs your attention through email, SMS, or webhooks.
Notification channels
Email alerts
Email is the primary notification channel, available on all paid plans.
- Uptime alerts — Site goes down or comes back up
- SSL alerts — Certificate expiring or expired
- Domain alerts — Domain registration expiring
- Content alerts — Keyword found/lost or page changed
SMS alerts
Get instant text message alerts for critical issues.
- Enter your phone number with country code
- Verify with the code sent to your phone
- Enable SMS for specific alert types
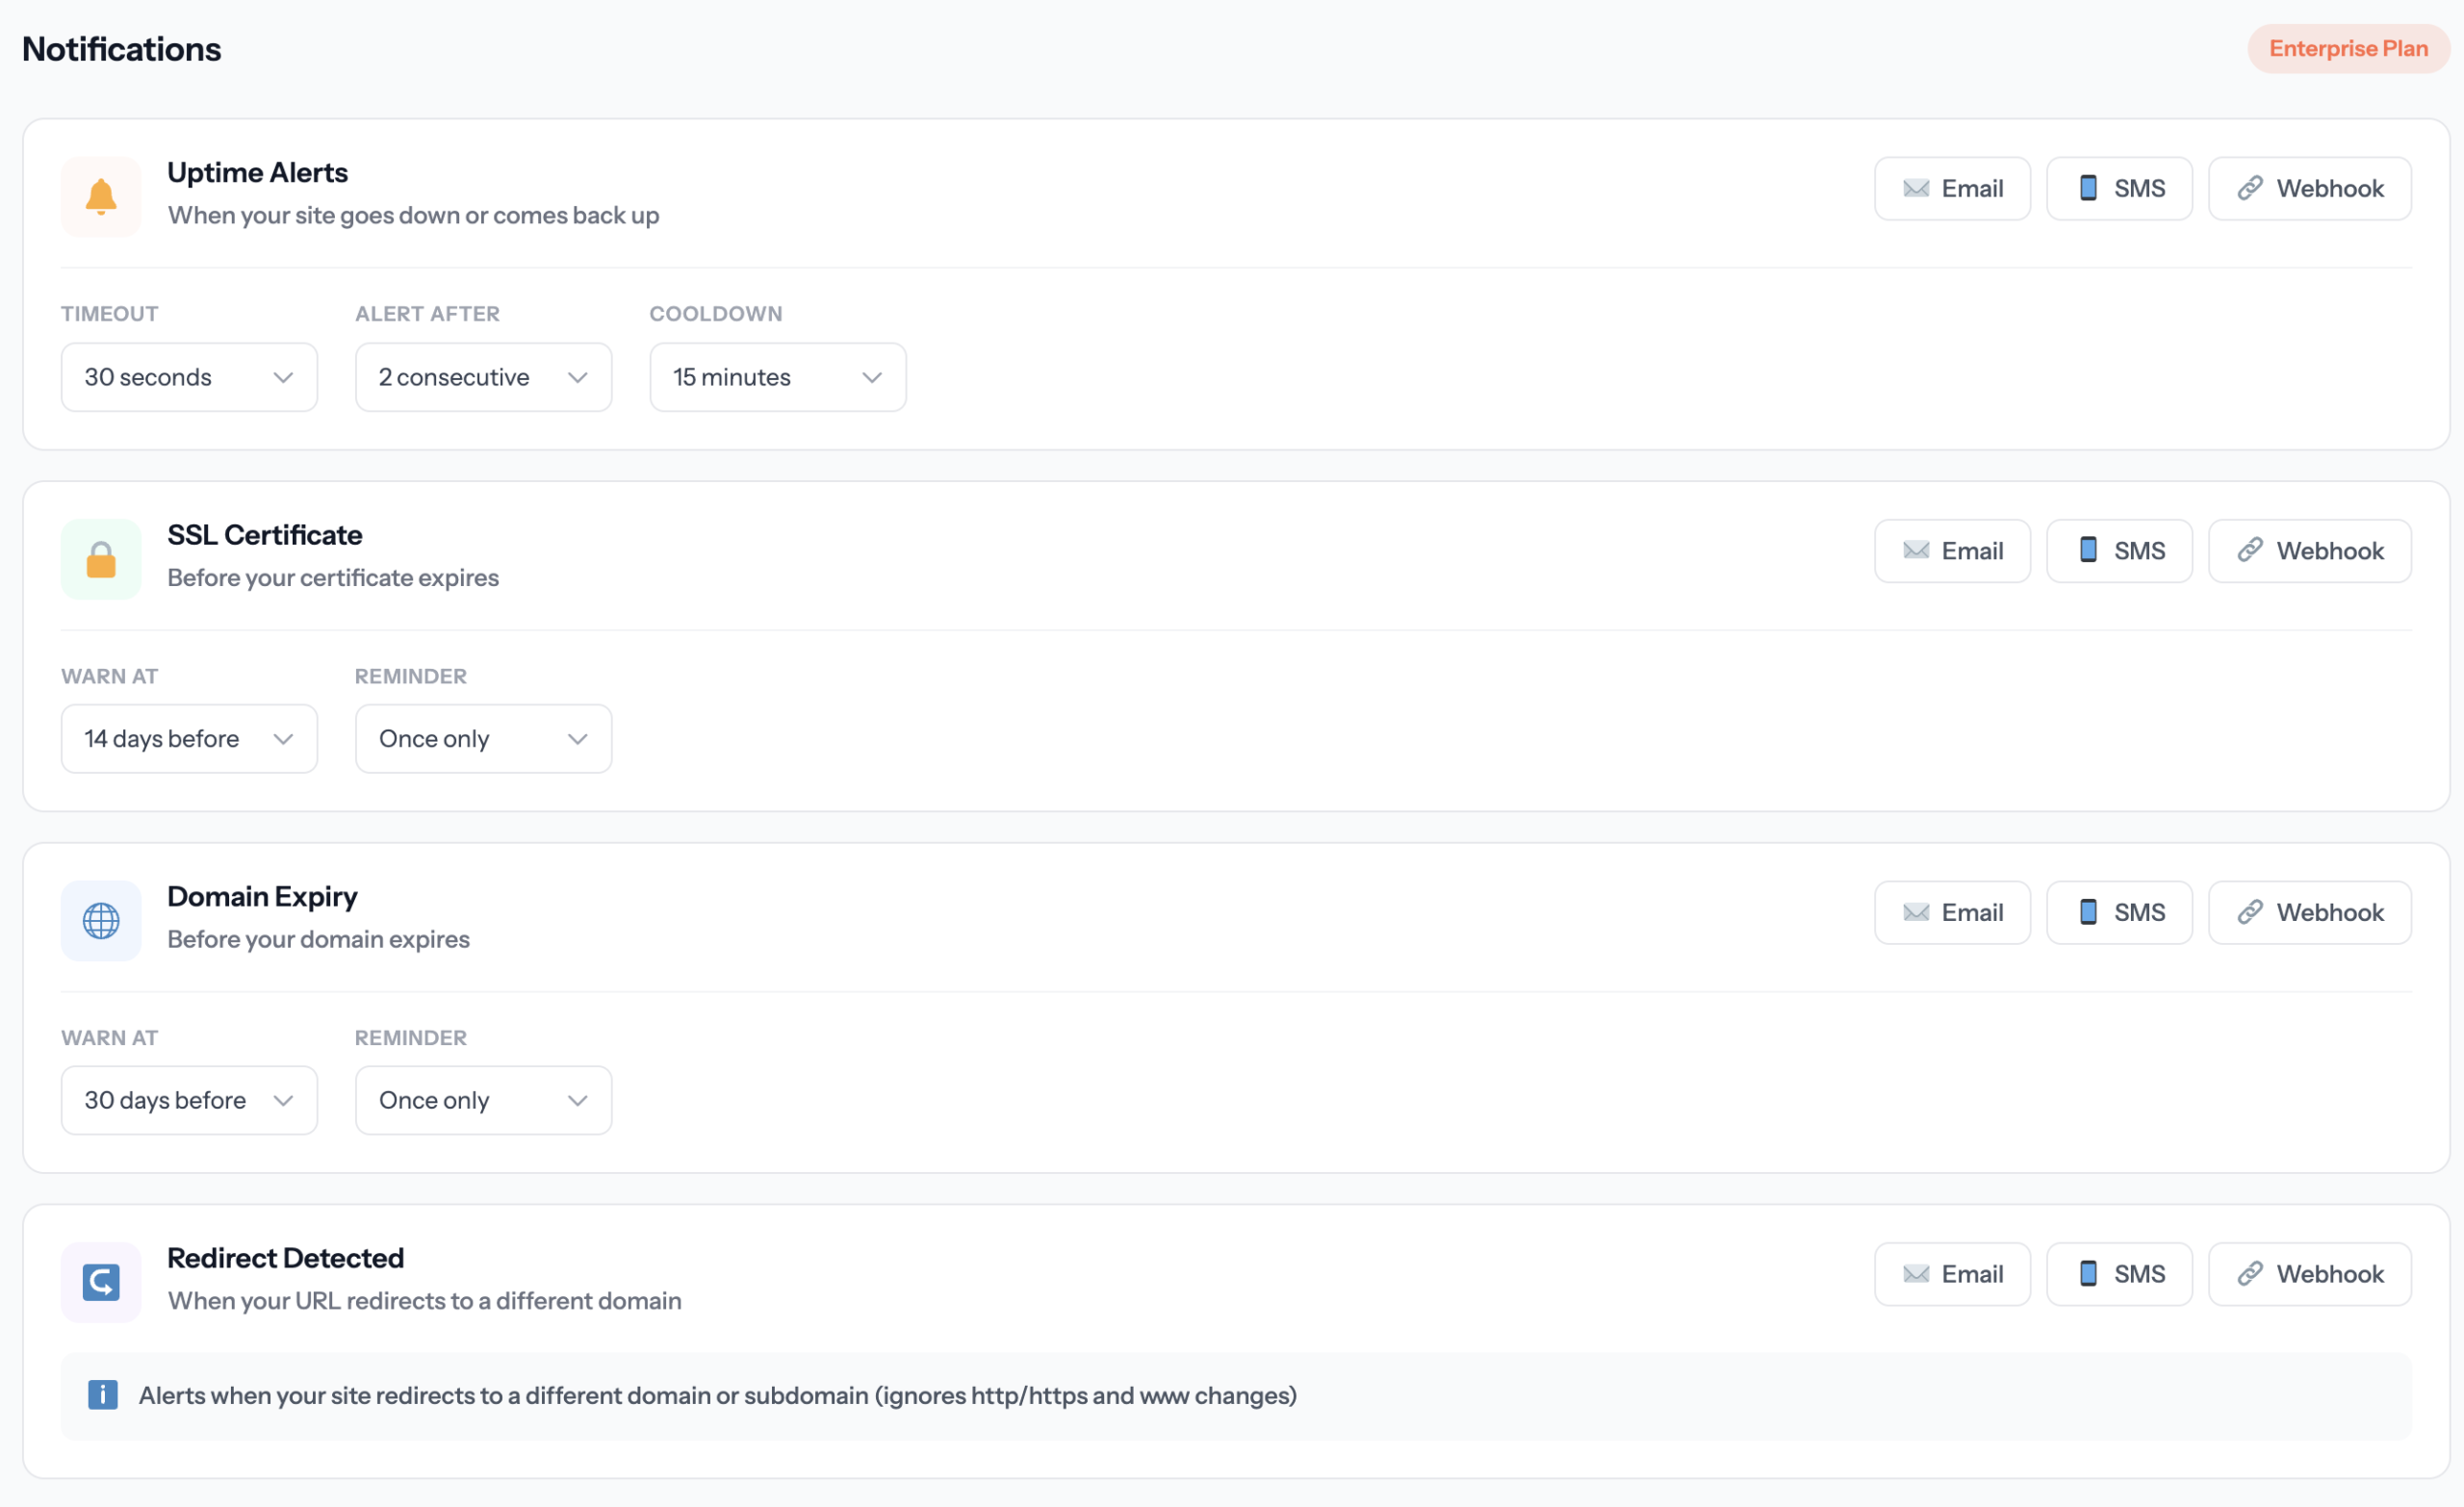
Webhook integrations
Send alerts to any URL endpoint — perfect for Slack, Discord, PagerDuty, or custom systems.
Enterprise onlyWebhook payload example
{
  "type": "uptime",
  "site": {
    "id": 123,
    "name": "My Website",
    "url": "https://example.com"
  },
  "status": "down",
  "message": "Site is not responding",
  "timestamp": "2026-01-08T12:00:00Z"
}
Per-site configuration
Each monitored site has independent notification settings, letting you:
- Enable different alert types for different sites
- Use different channels based on site importance
- Disable alerts for test/development sites
Public Status Pages
Share your uptime with customers and stakeholders through a public status page.
Paid plans onlyEnabling your status page
- Go to your site’s detail page
- Click the Settings tab
- Find the Public Status Page section
- Toggle it on
- Copy the shareable link

What status pages show
- Current status — Live indicator showing if the site is up or down
- Uptime percentage — 30-day uptime calculation
- Response time — Latest response time in milliseconds
- Uptime history — Visual 30-day uptime blocks
Sharing your status page
Your status page URL:
https://siterooster.com/status/{your-site-token}
Common uses:
- Add a “Status” link in your website footer
- Share during incidents to keep customers informed
- Include in SLA documentation
Account & Billing
Manage your subscription and account settings.
Plan comparison
SiteRooster offers four plans to fit different needs:
| Feature | Free | Small | Medium | Enterprise |
|---|---|---|---|---|
| Price (monthly) | $0 | $9 | $29 | $99 |
| Monitored Sites | 1 | 5 | 25 | 100 |
| Check Interval | 5 min | 1 min | 1 min | 1 min |
| Crawled Pages | 10 | 100 | 5,000 | 10,000 |
| Keyword Monitors | 1 | 5 | 50 | 200 |
| Page Monitors | 1 | 10 | 100 | 500 |
| SERP Credits/month | 10 | 250 | 2,500 | 10,000 |
| Email Alerts | — | ✓ | ✓ | ✓ |
| SMS Alerts | — | — | ✓ | ✓ |
| Webhooks | — | — | — | ✓ |
| Public Status Pages | — | ✓ | ✓ | ✓ |
Upgrading & downgrading
Upgrading your plan
- Visit the Pricing page
- Select your new plan
- Complete checkout
- Your account is upgraded immediately
When upgrading, you’ll be charged the prorated difference for the remainder of your billing period.
Downgrading your plan
- Go to your Account page
- Click Manage Subscription
- Select a different plan in the Stripe portal
Managing your subscription
All subscription management is handled through Stripe’s secure customer portal.
What you can do
- Update payment method
- View billing history
- Download invoices
- Change plans
- Cancel subscription
Accessing the portal
- Go to your Account page
- Click Manage Subscription
- You’ll be redirected to Stripe’s secure portal
Annual billing savings
Save 20% by switching to annual billing:
| Plan | Monthly | Annual | Savings |
|---|---|---|---|
| Small | $9/mo | $86/yr (~$7.17/mo) | $22/yr |
| Medium | $29/mo | $278/yr (~$23.17/mo) | $70/yr |
| Enterprise | $99/mo | $950/yr (~$79.17/mo) | $238/yr |